

Dempsey_86
-
Posts
576 -
Joined
-
Last visited
-
Days Won
15
Content Type
Profiles
Forums
Store
Gallery
Events
Downloads
News
Tutorials
Files posted by Dempsey_86
-
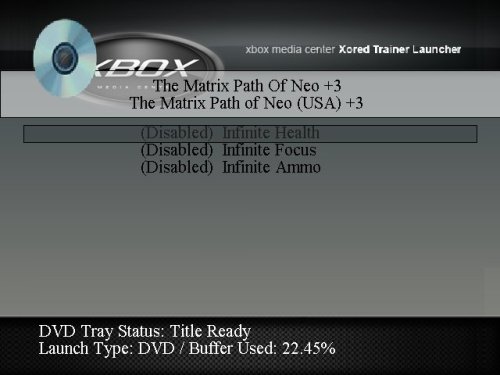
Xored Trainer Launcher
By Dempsey_86 in Applications
Xored Trainer Launcher is an application used to enable cheat programs, called trainers, in games.
14 downloads
(0 reviews)0 comments
Submitted
-
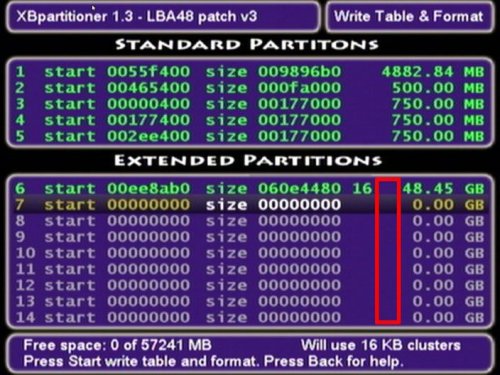
XBPartitioner
By Dempsey_86 in Applications
XBPartitioner is an application that will format Xbox partitions rewrite the parition table, and change hard drive cluster sizes.
11 downloads
(0 reviews)0 comments
Updated
-
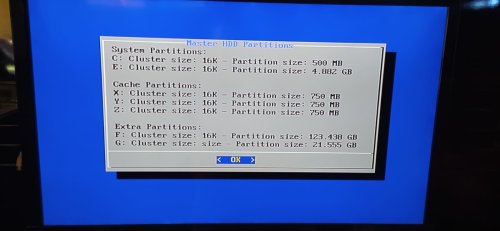
XBP Table Writer
By Dempsey_86 in Applications
This application is to be uses only if your master HDD doesn't have a partition table.
The purpose of this application is to allow people to clone there F partitions with Chimp 261812, the reason you cant do it normally is because I only allow the use of the Partition table for cloning.
So you will need to run this app and pick the correct option based on your partition layout.
How you know you don't have one:
1) Your HDD was formatted with UnleashX ( Hexen disc eg... ) EvolutionX or an older version of Chimp. ( 2618 or lower versions )
2) You have a F partition with around about 125GB max space & a G partition with the rest of the space.
3) You have a F partition with all space. ( note this could also mean you have a partition table, but its safe to update it via the app )
1 download
(0 reviews)0 comments
Submitted
-
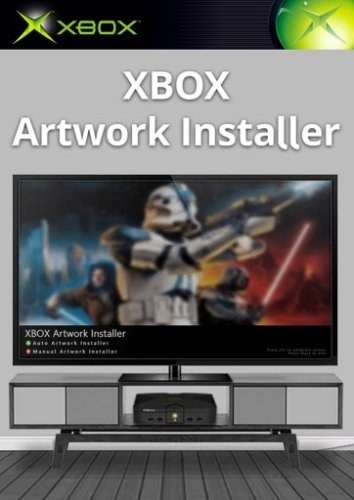
Xbox Artwork Installer
By Dempsey_86 in Applications
Xbox Artwork Installer: High Quality Complete Xbox Artwork with Automated Installation
An application used to install XBMC4Gamers and XBMC-Emustation compatible artwork to your Xbox game folders. Have your Xbox games in F:\Games and/or G:\Games and launch this application. Follow the instructions in the application to install your artwork. The installer works by looking at the Title ID inside the default.xbe of each Xbox game to identify the correct artwork to be copied to the respective Xbox game folder. Note, if two games have the same Title ID they will both get the same artwork. If this happens launch the application again and perform a manual artwork installation for the incorrectly populated Xbox game.
Credits: Rocky5
13 downloads
(0 reviews)0 comments
Submitted
-
Mimesis
By Dempsey_86 in Applications
Previously known as Mimesis Revived the original Mimesis v3 is back!
AngryCamel was nice enough to share the source code and all Mimesis Revived fixes have been backported into the official code! Thanks dude ❤️
This is a reworked version of Project Mimesis 3 by AngryCamel, Ramzi, and CLuis.
I've done what I can to restore Project Mimesis' old content but much was lost to time.
-CrunchBite
-Complete DLC management from within the application
-Disable/Enable individual DLC
-Verify TitleUpdate is compatible with DLC
-Multiple games supported
-More to come!
4 downloads
(0 reviews)0 comments
Submitted
-
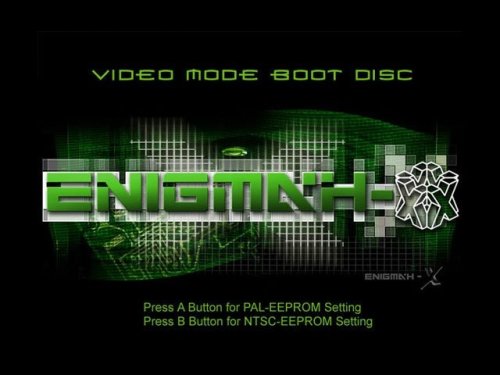
Enigmah-X
By Dempsey_86 in Applications
Enigmah-X is an application that switches your EEPROM region to either PAL or NTSC. This is useful because using NTSC region allows your Xbox to output at 480p, 720p and 1080i through component cables.
Changing your Region:
Run the application and it will display your current region. Press A to change it to PAL, and press B to change it to NTSC. To exit, press LT+RT+Black.
6 downloads
(0 reviews)0 comments
Submitted
-
 (0 reviews)
0 comments
Submitted
-
DVDX
By Dempsey_86 in Applications
DVD playback without the need for the official DVD dongle.
12 downloads
(0 reviews)0 comments
Submitted
-
DVD2Xbox
By Dempsey_86 in Applications
DVD2Xbox is an application for backing up Xbox game discs to a modded Xbox HDD. Includes ACL patches.
11 downloads
(0 reviews)0 comments
Submitted
-
Action Replay
By Dempsey_86 in Applications
Action replay the ultimate cheat system
Take your gaming to new levels of fun and excitement with the ultimate cheat system for Xbox! Action Replay can give you everything you want...and more! Choose from the huge range of specially created Powersaves for extra weapons, ammo, power and energy. Load special levels, features and much more! Only Action Replay can unlock the hidden secrets that game developers don't want you to discover! The code cracking team at www.codejunkies.com worked constantly back in the day to produce gamebusting powersaves for the latest games and now these powersaves are available again through this Xbox application thanks to Rocky5 and the Xbox modding community. This Action Replay application allows you to install the powersaves from the Action Replay disc and the Code Junkies old online database. Take on the biggest and best games! Unleash the Power - Beat the Game! Requires 1.8gb of space on first run of the application to extract the saves.
Credits: Rocky5
27 downloads
(0 reviews)0 comments
Updated
-
ConfigMagic
By Dempsey_86 in Applications
ConfigMagic (orginally made by Team Assembly) modified by Yoshihiro to add support for Xbox v1.6/v1.6b EEPROMs.
You can now read and modify EEPROMs of Xbox v1.0 to 1.6(b) directly on your Xbox with this release.
The source code of this new modified version has also been released.
Thanks goes to the Xbox-Linux Team, this release is based on their sources.
Yoshihiro: http://www.yoshihiro-dev.com
Team Assembly: http://www.team-assembly.com
14 downloads
(0 reviews)0 comments
Updated
-

Dashloader Customizer
By Dempsey_86 in Applications
This is an application that will let you configure the face buttons for launching custom paths with the face buttons of the pad on boot of the Xbox.
14 downloads
(0 reviews)0 comments
Updated
-
Controller Test
By Dempsey_86 in Applications
Controller Test is an application used to test your gamepad buttons and other stuff.
8 downloads
(0 reviews)0 comments
Updated
-

Chimp
By Dempsey_86 in Applications
Updated version of chimp by rocky5
readme:
==================================================================
Another small update - 17/12/2016:
==================================================================
Well it would seem I have to change the menu system because people still unlock there softmodded Xbox HDD when the options are disabled by default.
So I have added a new menu and a disclaimer that you must agree to when you pick an option.
I also disabled options based on the mod type you select and also made the lock HDD error a but more pleasing to the eye.
Note: If you get the slave drive error about locking, this is because HDTool cannot lock the drive, there is nothing I can do to fix this.
==================================================================
Another small update - 09/12/2016:
==================================================================
Slight change to the locking dialogue after a successful clone.
Added a slave drive lock check when the menu loads, and I also disable options if the drive cannot be locked.
( This should help people when faced with a non lockable HDD, saves cloning to find out 😄 )
==================================================================
Another small update - 28/11/2016:
==================================================================
Moved to psyko_chewbacca version of GentooxLoader, he had updated the loader and recommended using it as his can also be compiled on modern linux systems.
So its the same edits as before just on a more up to date source.
psyko_chewbacca modified GentooxLoader can be found here
https://bitbucket.org/psyko_chewbacca/gentooxloader
==================================================================
Small update - 25/11/2016:
==================================================================
Added my modified version of Gentoox loader that auto boot chimp and boot from 6 locations on the E partition.
( note: E partition is mandatory )
E:\applications\chimp
E:\applications\chimp loader
E:\apps\chimp
E:\apps\chimp loader
E:\chimp
E:\chimp loader
Also changed the wording of the Fix error 16 dialogue.
==================================================================
Small update - 05/08/2016:
==================================================================
Added a new option to the Slave drive options.
Fix Error 16, this will clone your working C partition from your master drive.
(it only clones the C partition, all other partitions & partition table if present stay intact)
==================================================================
Old Chimp 261812 Changes
==================================================================
1. Redone the menus.
2. Added lock master HDD.
(not sure why its not there by default)
3. Added format extra partitions for slave drive.
4. Changed buffer size back to 512kb, as anything above this value will result in error 13.
5. Removed -d from hdtool in lockhda & lockhdb as hdtool doesn't use -d.
6. Fixed the Pipe Viewer (Progress bar you see when cloning a HDD) fits the screen better.
7. Also padded the top of the screen for the above & the no progress variant.
(was required to compensate for overscan)
8. Changed the menu system in lpartitionerhda & lpartitionerhdb, stops the error about line 106.
9. Changed how the IDE information is gathered.
(its a lot cleaner looking)
10. Moved the formating of the slave hd untill after the user chooses the options.
(saves on time for me testing things & means the user can exit before formating the slave drive)
11. Removed the bloody flashing cursor!
12. Option to lock the slave hd after the cloning procedure is complete.
13. Changed the shell background colour for Linux shell & for all other instances.
14. Fixed the scanpartitions shell script, now mounts the drives and added a umount version.
(note this isnt used, but I just fixed it anyways.)
15. Added support for E:\eeprom.bin on the xbox fatx partition.
(ie, before you launch chimp & its case sensitive.)
16. Advanced settings, for the Master HD.
(Enable in settings)
17. Added a more informative error screen for no partition table found.
18. Updated cloning to dynamically get the byte size.
(faster cloning depending on the partition size)
19. New cloning options.
20. Shutdown & Restart confirm dialogues.
21. New gentoox loader that auto boots chimp.
22. Probably more changes, but lost track. 😕
10 downloads
(0 reviews)0 comments
Submitted
-
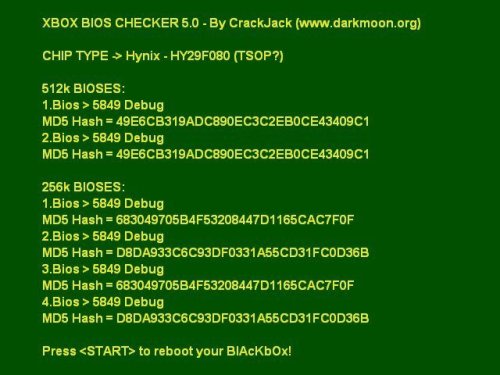
BIOS Checker
By Dempsey_86 in Applications
Bios Checker
*******************
*USING BIOSCHECKER*
*******************
1) Copy on a CDRW or on xbox HD the "Media" directory, "Bioses.ini" file and "default.xbe" contained in the BiosChecker
distribution ZIP file
2) Execute "default.xbe" to know what kind of bios are you using
3) Enjoy 😉
****************
*USING BIOSSCAN*
****************
1) Copy BiosScan.exe and Bioses.ini into a directory on your HD 🙂
2) If you want to scan for a bios, browse using file navigation panel and select desired file. Then click on
"Check Selected Bios" button.
3) If you want to compute MD5 hashes of one or more bioses select them using file navigation panel and then click on
"Update MD5 hashes in bioses.ini" to add hashes to BIOSES.INI file. Multiple file selection ALLOWED 🙂
SPECIAL NOTES:
-------------
BiosChecker for XBOX is based on XFLASH source code of Dysfunction.
XFLASH is a GREAT and very useful program that can flash your XBOX bios. Every day I use it 4 o 5 times 🙂
It's Great!!
33 downloads
(0 reviews)0 comments
Submitted
-
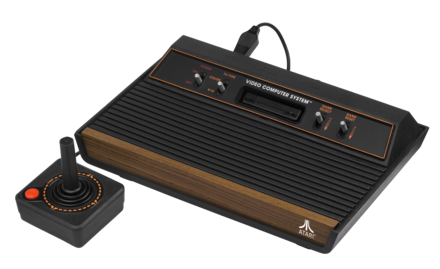
Z26X
By Dempsey_86 in Emulators
Z26X - Atari 2600 Emulator for XBox
User Guide:
- Emulates the Atari 2600
- Accurate Pitfall 2 emulation and SuperCharger emulation
- Near perfect compatibility - ported from Z26
=============
Configuration
=============
Almost everything can be changed from the configuration menu. Here are the
things that require manual modifications to the Z26X.INI file included in
the package:
Samba share name - goes in the [GENERAL] section. Example:
smbshare=SMB://USERNAME:PASSWORD@COMPUTERNAME/SHARENAME
Screenshot directory - default is E:\SCREENSHOTS - goes in [GENERAL] section
Example:
screenshot_dir=E:\SCREENSHOTS
Skin directory - where skins can be found. Default is D:\EMUSKINS - goes in
[GENERAL] section. Example:
skin_dir=D:\EMUSKINS
Save directory - this is where you want all your saved games to be stored.
Default is E:\SAVES\Z26X. Goes in [GENERAL] section. Example:
save_dir=E:\SAVES\Z26X
The default ROM directory INI setting goes in the [GENERAL] section as follows:
rom_dir=d:\a26roms
If you change any of the above items, then you must upload the new Z26X.INI
file to your XBox, load up Z26X, then select "Force Reload D:\\*.ini
Settings" from the Configuration menu. Please note that this will overwrite
any of the setting changes you might have made after you first loaded
Z26X.
Controls:
===============
Menu Navigation
===============
Select menu options with the DPAD or with R/LTrigger. The speed of
R/LTrigger movements can be controlled by :
Configuration -> Menu Scroll Speed
There are some places where you can enter or change values. This
can usually be done in a variety of ways include DPAD Left/Right,
R/L Trigger, and L/R Thumb. Try all of them if the values are changing
too slowly.
"A" selects the highlighted choice. "B" cancels/returns.
"Y" from a file-select list will go up one directory.
Screenshots:
Credits:
X-port for porting a great collection of emu's over to the xbox, releasing the source code, and answering my stupid questions.
Atariage (Albert in particular) - For providing a place for me to ramble on. For encouragement in general.
Gilou9999 for a new PM3 skin, synopsis, suggestions, etc.
Bigby, Du0ph0ne, TheMaster3, Nytmar3 for some beta testing.
Comments of support from various interested parties.
If I missed anybody shoot me an email and I'll update this file.
6 downloads
(1 review)0 comments
Submitted
-
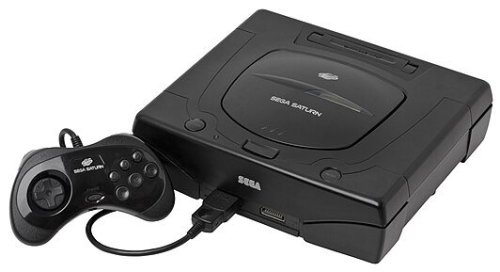
Yabause
By Dempsey_86 in Emulators
Yabause - Sega Saturn emulator for Xbox
User Guide:
Yabause A2 unofficial is compiled. This is the XBOX port of Yabause. Yabause is a Sega Saturn Emulator(SS Emulator) for Linux, Windows and Mac OS X.Yabause support booting games using Saturn cds or iso files.
Screenshots:
5 downloads
(0 reviews)0 comments
Submitted
-

XRaine
By Dempsey_86 in Emulators
Raine a very fast arcade emulator.
xRaine ported by A600
This is a port for the Xbox1 of Raine, a very fast arcade emulator, coded by Antiriad and
Emmanuel Anne (Tux) (if you like the emu, consider donating to him as a way of saying
thanks for his hard work) and possible thanks to the SDLx libs by lantus.
User Guide:
- Copy the roms to the \roms folder.
- The xRaine.dat is a dat file for clrmamepro.
The xresizer.xbe included, allows to resize the screen for those with overscan problems. It
generates a xbox.cfg with this default settings:
xpos=0
ypos=0
xstretch=0
ystretch=0
flickerfilter=1
720p=1
The flickerfilter option can be a number between 0 and 5.
NOTE: for a pixel perfect screen with correct aspect ratio these values
should be used:
480p:
-----
xpos=40
ypos=0
xstretch=-80
ystretch=0
720p:
-----
xpos=160
ypos=0
xstretch=-320
ystretch=0
Controls:
A -> Button 1
B -> Button 2
X -> Button 3
Y -> Button 4
Left Trigger -> Load Game
Right Trigger -> Save Game
Black -> Show Gui
Right Analog Thumb -> Save Screenshot (to be used for the gui)
Start -> Start
Back -> Insert Coin
All controls can be remapped using the gui.
Screenshots:
Credits:
coded by Antiriad and Emmanuel Anne (Tux)
SDLx libs by lantus
5 downloads
(0 reviews)0 comments
Submitted
-
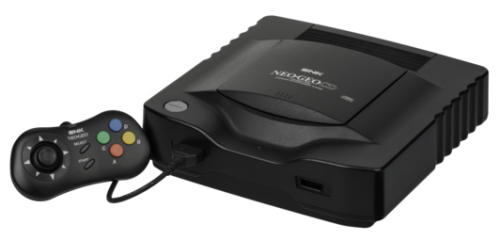
XNeoRaine
By Dempsey_86 in Emulators
NeoRaine - Neo Geo CD emulator for Xbox.
ported by A600
This is a port for the Xbox of NeoRaine, the best Neo Geo CD emulator out there, coded
by Emmanuel Anne (Tux) (if you like the emu, consider donating to him as a way of saying
thanks for his hard work) and possible thanks to the SDLx libs by lantus.
User Guide:
- You need to copy the Neo CD bios (neocd.bin) to the folder where the default.xbe is.
- Loading animations are disabled for now because they aren't correctly displayed on the Xbox.
- NeoRaine doesn't emulate the raster effects so games like Riding Hero are unplayable.
- CD images should be copied to the \games folder and must be cue + iso + audio tracks.
- Audio tracks formats supported are WAV, MP3, OGG and FLAC.
- Keep the names of the files as short as possible and avoid using chars like '[' or '('
Here is an example of a cue:
FILE "Neo DriftOut - 01.iso" BINARY
TRACK 01 MODE1/2048
INDEX 01 00:00:00
FILE "Neo DriftOut - 02.flac" WAVE
TRACK 02 AUDIO
PREGAP 00:02:00
INDEX 01 00:00:00
FILE "Neo DriftOut - 03.flac" WAVE
TRACK 03 AUDIO
INDEX 00 00:00:00
INDEX 01 00:02:00
.
.
.
The xresizer.xbe included, allows the resize the screen for those with overscan problems. It
generates a xbox.cfg with this default settings:
xpos=0
ypos=0
xstretch=0
ystretch=0
flickerfilter=1
720p=1
The flickerfilter option can be a number between 0 and 5.
Controls:
A -> A
B -> B
X -> C
Y -> D
Left Trigger -> Load Game
Right Trigger -> Save Game
Black -> Show Gui
Right Analog Thumb -> Reset Game
Start -> Start
Back -> Select
All controls can be remapped using the gui.
Screenshots:
Credits:
coded by Emmanuel Anne (Tux)
SDLx libs by lantus
4 downloads
(0 reviews)0 comments
Submitted
-

Xboyadvance
By Dempsey_86 in Emulators
XBoyAdvance - GBA/GBC/GB/SGB/SGB2 Emulator for XBox.
User Guide:
- Emulates the Gameboy Advance, Gameboy Color, Gameboy Mono, SuperGameboy 1 and 2
- Excellent compatibility - ported from VisualBoy Advance v1.5.1
Various Important Notes:
============
Saving Games
============
This is a common pitfall with XBox emulators of consoles that use SRAM.
If you are playing, for example, Zelda, then when you have saved the game,
you must go back to the game select menu.
If you just turn off your XBox while you are still playing the game, then
your saves will not be written to the XBox hard drive and it will be like you
never saved your game.
=============
Configuration
=============
Almost everything can be changed from the configuration menu. Here are the
things that require manual modifications to the XBoyAdvance.INI file included in
the package:
Samba share name - goes in the [GENERAL] section. Example:
smbshare=SMB://USERNAME:PASSWORD@COMPUTERNAME/SHARENAME
Screenshot directory - default is E:\SCREENSHOTS - goes in [GENERAL] section
Example:
screenshot_dir=E:\SCREENSHOTS
Skin directory - where skins can be found. Default is D:\EMUSKINS - goes in
[GENERAL] section. Example:
skin_dir=D:\EMUSKINS
Save directory - this is where you want all your saved games to be stored.
Default is E:\SAVES\XBOYADVANCE. Goes in [GENERAL] section. Example:
save_dir=E:\SAVES\XBOYADVANCE
The default ROM directory INI setting goes in the [GENERAL] section as follows:
rom_dir=e:\games\gbaroms
If you change any of the above items, then you must upload the new XBoyAdvance.INI
file to your XBox, load up XBoyAdvance, then select "Force Reload D:\\*.ini
Settings" from the Configuration menu. Please note that this will overwrite
any of the setting changes you might have made after you first loaded
XBoyAdvance.
Controls:
===============
Menu Navigation
===============
Select menu options with the DPAD or with R/LTrigger. The speed of
R/LTrigger movements can be controlled by :
Configuration -> Menu Scroll Speed
There are some places where you can enter or change values. This
can usually be done in a variety of ways include DPAD Left/Right,
R/L Trigger, and L/R Thumb. Try all of them if the values are changing
too slowly.
"A" selects the highlighted choice. "B" cancels/returns.
"Y" from a file-select list will go up one directory.
Screenshots:
Credits:
X-port for porting a great collection of emu's over to the xbox, releasing the source code, and answering my stupid questions.
Atariage (Albert in particular) - For providing a place for me to ramble on. For encouragement in general.
Gilou9999 for a new PM3 skin, synopsis, suggestions, etc.
Comments of support from various interested parties.
If I missed anybody shoot me an email and I'll update this file.
14 downloads
(0 reviews)0 comments
Submitted
-
X68000X
By Dempsey_86 in Emulators
X68000X X68000 Emulator port for XBox.
User Guide:
- Emulates X68000
- Excellent compatibility - ported from Keropi
Default ROM dir is D:\X68KDISKS
===============
Important Notes
===============
Some games require framerates greater than 60fps. To allow for this, the refresh rate
must be "turned off" to allow immediate refresh of the screen. However, this is not
compatible with high-definition modes. If you are trying to play a game in a HD mode
(like 1080i) and the sound is all choppy, then you'll have to revert back to normal 480i
to play the game correctly.
Additionally, for optimal performance, the screen is not updated unless changes have been
made to it. If you are fast-forwarding through disk loads, oftentimes you will fast forward
through the most recent screen update and you won't see the changes. If you're staring at a
black screen after fast-forwarding and you think something is up, you can either press
the Left-Thumbstick to bring up the on-screen keyboard or you can press the Right-Thumbstick
to bring up the In-Game Options menu. This will force a refresh of the screen and you can
see what's what.
The native resolution of the X68000 is 768x512. The XBox (without a highdef A/V pack) can only
do 640x480 - so when you load some games don't be surprised if the text is all garbled.
Fortunately this doesn't really affect gameplay once graphics are on-screen. If you
have a highdef A/V pack, then changing to 1080i mode will make things look much nicer.
============
Configuration
=============
Everything can be changed from the configuration menu.
To change things like default save directory, default game directory, etc, go to
Main Menu -> Configuration -> Change Default Directories
Controls:
===============
Menu Navigation
===============
Select menu options with the DPAD or with R/LTrigger. The speed of
R/LTrigger movements can be controlled by :
Configuration -> Menu Scroll Speed
There are some places where you can enter or change values. This
can usually be done in a variety of ways include DPAD Left/Right,
R/L Trigger, and L/R Thumb. Try all of them if the values are changing
too slowly.
"A" selects the highlighted choice. "B" cancels/returns.
"Y" from a file-select list will go up one directory.
Screenshots:
Credits:
X-port for porting a great collection of emu's over to the xbox, releasing the source code, and answering my stupid questions.
Atariage (Albert in particular) - For providing a place for me to ramble on. For encouragement in general.
Gilou9999 for a new PM3 skin, synopsis, suggestions, etc.
Bigby, Du0ph0ne, TheMaster3, Nytmar3 for some beta testing.
Comments of support from various interested parties.
If I missed anybody shoot me an email and I'll update this file.
3 downloads
(0 reviews)0 comments
Submitted
-
WonderSwanX
By Dempsey_86 in Emulators
WonderSwanX WonderSwan Emulator port for XBox.
User Guide:
- Emulates WonderSwan
- Excellent compatibility - ported from OSwan
- Full sound
Default ROM dir is D:\WSWANROMS
===============
Important Notes
===============
If the controllers seem to be messed up on certain games, use the "Revert Controllers"
option from the "Configure Game" menu.
Sometimes you will need to fine tune the cycles per line setting to get the best
results. Do this from the "Configure Game" menu also.
=============
Configuration
=============
Almost everything can be changed from the configuration menu. Here are the
things that require manual modifications to the WONDERSWANX.INI file included in
the package:
Samba share name - goes in the [GENERAL] section. Example:
smbshare=SMB://USERNAME:PASSWORD@COMPUTERNAME/SHARENAME
Screenshot directory - default is E:\SCREENSHOTS - goes in [GENERAL] section
Example:
screenshot_dir=E:\SCREENSHOTS
Skin directory - where skins can be found. Default is D:\EMUSKINS - goes in
[GENERAL] section. Example:
skin_dir=D:\EMUSKINS
Save directory - this is where you want all your saved games to be stored.
Default is E:\SAVES\WONDERSWANX. Goes in [GENERAL] section. Example:
save_dir=E:\SAVES\WONDERSWANX
The default ROM directory INI setting goes in the [GENERAL] section as follows:
rom_dir=d:\WSWANROMS
If you change any of the above items, then you must upload the new WONDERSWANX.INI
file to your XBox, load up WONDERSWANX, then select "Force Reload D:\\*.ini
Settings" from the Configuration menu. Please note that this will overwrite
any of the setting changes you might have made after you first loaded
WONDERSWANX.
Controls:
===============
Menu Navigation
===============
Select menu options with the DPAD or with R/LTrigger. The speed of
R/LTrigger movements can be controlled by :
Configuration -> Menu Scroll Speed
There are some places where you can enter or change values. This
can usually be done in a variety of ways include DPAD Left/Right,
R/L Trigger, and L/R Thumb. Try all of them if the values are changing
too slowly.
"A" selects the highlighted choice. "B" cancels/returns.
"Y" from a file-select list will go up one directory.
Screenshots:
Credits:
X-port for porting a great collection of emu's over to the xbox, releasing the source code, and answering my stupid questions.
Atariage (Albert in particular) - For providing a place for me to ramble on. For encouragement in general.
Gilou9999 for a new PM3 skin, synopsis, suggestions, etc.
Bigby, Du0ph0ne, TheMaster3, Nytmar3 for some beta testing.
Comments of support from various interested parties.
If I missed anybody shoot me an email and I'll update this file.
3 downloads
(0 reviews)0 comments
Submitted
-
Winuaex Lite
By Dempsey_86 in Emulators
WinUAEX Amiga Emulator port for XBox.
User Guide:
- Emulates Amiga
- Excellent compatibility - ported from WinUAE 0.8.27
Default ROM dir is D:\AMIGADISKS
The default configuration will work with most non-AGA games, but some games do require
tweaking. For AGA games, I suggest using KICK31. There are lots of tutorials,
docs, and forums about configuring games for use in WinUAE. I suggest you read
them first if you are having a problem getting a game to run. I have found that
just about every game will work if you fiddle with the settings enough. There are
also different versions of various games. If one does not work, try to find another.
In the few cases that I couldn't get a game to work, I found that it also did not work
in the Windows version of WinUAE.
Controls:
It seems the normal configuration that many games expect is for a mouse to be
plugged into port 1 and a joystick in port 2. The default configuration for
your controller is as follows:
The following buttons apply to the controller assigned to port 2 which is
defaulted to an Amiga Joystick:
XBox DPAD - Port 2 Up/Down/Left/Right
XBox A - Port 2 Button 1 (Joystick Button 1 or Mouse Left Button)
XBox B - Port 2 Button 2 (Joystick Button 2 or Mouse Right Button)
XBox X - Port 2 Button 3 (Joystick Button 3 or Mouse Middle Button)
The following buttons apply to the controler assigne to port 1 which is
defaulted to an Amiga Mouse:
XBox Y - Port 1 Button 1 (Joystick Button1 or Mouse Left Button)
XBox Black - Port 1 Button 2 (Joystick Button 2 or Mouse Right Button)
XBox White - Port 1 Button 3 (Joystick Button 3 or Mouse Middle Button)
The XBox Left Thumbstick will always control the mouse cursor regardless of
the port to which it is assigned. (The same thing applies to a real mouse
if you have one connected.)
Screenshots:
Credits:
X-port for porting a great collection of emu's over to the xbox, releasing the source code, and answering my stupid questions.
Atariage (Albert in particular) - For providing a place for me to ramble on. For encouragement in general.
Gilou9999 for a new PM3 skin, synopsis, suggestions, etc.
Waal and Bigby for putting this thing on the fast track!
Bigby, Du0ph0ne, TheMaster3, Nytmar3 for some beta testing.
Comments of support from various interested parties.
If I missed anybody shoot me an email and I'll update this file.
Be sure to check out the Amiga start pack created by waal, Bigby, and with a little help from me. It's out there.
Be sure to read the "starter kit tips.txt" file since even with a starter kit the Amiga is still a fairly complex machine and some things need to be understood in regards to operating the emulator with the starter pack.
6 downloads
(0 reviews)0 comments
Submitted
-
WinstonX
By Dempsey_86 in Emulators
WinSTonX Atari ST Emulator port for XBox.
User Guide:
- Emulates the Atari ST
- Excellent compatibility - ported from WinSTon
Default ROM dir is D:\STDISKS
=============
Configuration
=============
Almost everything can be changed from the configuration menu. Here are the
things that require manual modifications to the WINSTONX.INI file included in
the package:
Samba share name - goes in the [GENERAL] section. Example:
smbshare=SMB://USERNAME:PASSWORD@COMPUTERNAME/SHARENAME
Screenshot directory - default is E:\SCREENSHOTS - goes in [GENERAL] section
Example:
screenshot_dir=E:\SCREENSHOTS
Skin directory - where skins can be found. Default is D:\EMUSKINS - goes in
[GENERAL] section. Example:
skin_dir=D:\EMUSKINS
Save directory - this is where you want all your saved games to be stored.
Default is E:\SAVES\WINSTONX. Goes in [GENERAL] section. Example:
save_dir=E:\SAVES\WINSTONX
The default ROM directory INI setting goes in the [GENERAL] section as follows:
rom_dir=d:\stdisks
If you change any of the above items, then you must upload the new WINSTONX.INI
file to your XBox, load up WINSTONX, then select "Force Reload D:\\*.ini
Settings" from the Configuration menu. Please note that this will overwrite
any of the setting changes you might have made after you first loaded
WINSTONX.
Controls:
===============
Menu Navigation
===============
Select menu options with the DPAD or with R/LTrigger. The speed of
R/LTrigger movements can be controlled by :
Configuration -> Menu Scroll Speed
There are some places where you can enter or change values. This
can usually be done in a variety of ways include DPAD Left/Right,
R/L Trigger, and L/R Thumb. Try all of them if the values are changing
too slowly.
"A" selects the highlighted choice. "B" cancels/returns.
"Y" from a file-select list will go up one directory.
Screenshots:
Credits:
X-port for porting a great collection of emu's over to the xbox, releasing the source code, and answering my stupid questions.
Atariage (Albert in particular) - For providing a place for me to ramble on. For encouragement in general.
Gilou9999 for a new PM3 skin, synopsis, suggestions, etc.
Bigby, Du0ph0ne, TheMaster3, Nytmar3 for some beta testing.
Comments of support from various interested parties.
If I missed anybody shoot me an email and I'll update this file.
2 downloads
(0 reviews)0 comments
Submitted
-
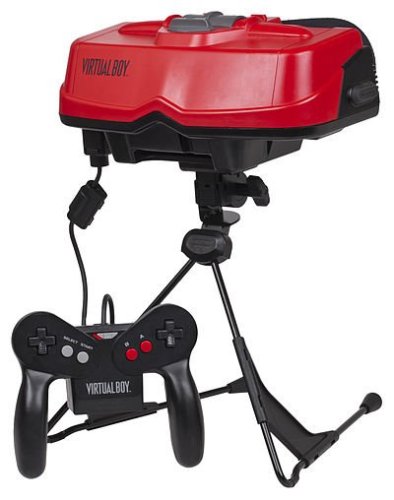
Virtualboyx
By Dempsey_86 in Emulators
VirtualBoyX - Virtual Boy Emulator for XBox.
User Guide:
- Emulates the Nintendo Virtual Boy
- Excellent compatibility - ported from Red Dragon
- Sound
Notes
-----
Put games in the \VBROMS directory
Rather slow, but very playable with 2-3 frameskip.
Screenshots:
Credits:
X-port for porting a great collection of emu's over to the xbox, releasing the source code, and answering my stupid questions.
Atariage (Albert in particular) - For providing a place for me to ramble on. For encouragement in general.
Gilou9999 for a new PM3 skin, synopsis, suggestions, etc.
Bigby, Du0ph0ne, TheMaster3, Nytmar3 for some beta testing.
Comments of support from various interested parties.
If I missed anybody shoot me an email and I'll update this file.
5 downloads
(0 reviews)0 comments
Submitted