All Activity
- Today
-
 NevermanX joined the community
 -
 pelicon joined the community
 -
 ar9 joined the community
 - Yesterday
-
 luigility joined the community
 -
 juan2876 joined the community
 -
 ALF joined the community
 -
 Slinkoguy joined the community
 -
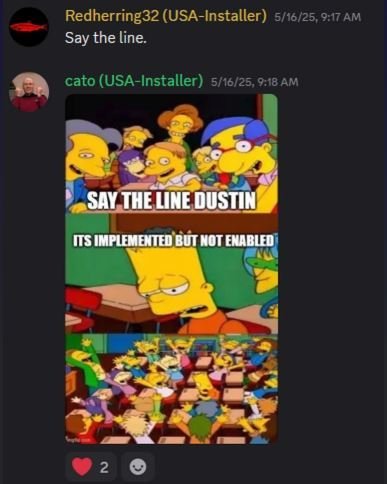
 Hot damn! The response from everyone who contributed to the response is truly masterful. Clear, clean, without malice and point by point. I'm not looking to stir up more conversation or drama in the scene discord but wanted to give a shout out to all involved in the response forum thread. So I'll do it here. I know I get sentimental but it makes me very proud to be in the scene community when the people looked to as leaders and innovators respond with such class.
 -
 As much as I want to say that this is a complex issue, it shouldn't of been exaggerated on what is basically a public level, the fact that it has gone this far is appalling. But hey, that's the internet, anything for a click. We're only a small community, and if things like this come up in the future it'll only make us seem more toxic and it'd make people rethink getting involved. Now let's shut up and play some Xbawks.
 -
 Well written responses from all of you. Its a shame it came to this at all but needs must. Lets see what the pineapple squad come back with. Maybe they will want to end the scene division once and for all. I doubt it personally but hey stranger things have happened.
 -
 I'm super sorry to hear about such despicable behavior. I'm super new to the Xbox Modding community in general, all projects I've seen so far, regardless of the party that created them, have one thing in common: love and passion for the consoles that unite us all. Truely a shame to see this controversy becoming what it is now, potentially even something worse as time moves on. I hope everyone involved in this will once and for all find peace. Now for some Xbawks!
 -
 Far out this is a heavy but required read. I'm glad to hear the truth come out. Really makes you think what some peoples endgames are hey? Shout-out to the Xbox community for coming together and setting the record straight. Time to play some Xbawks!
 - Last week
-
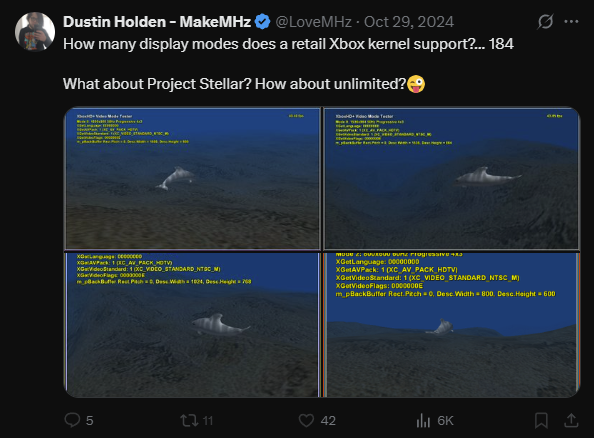
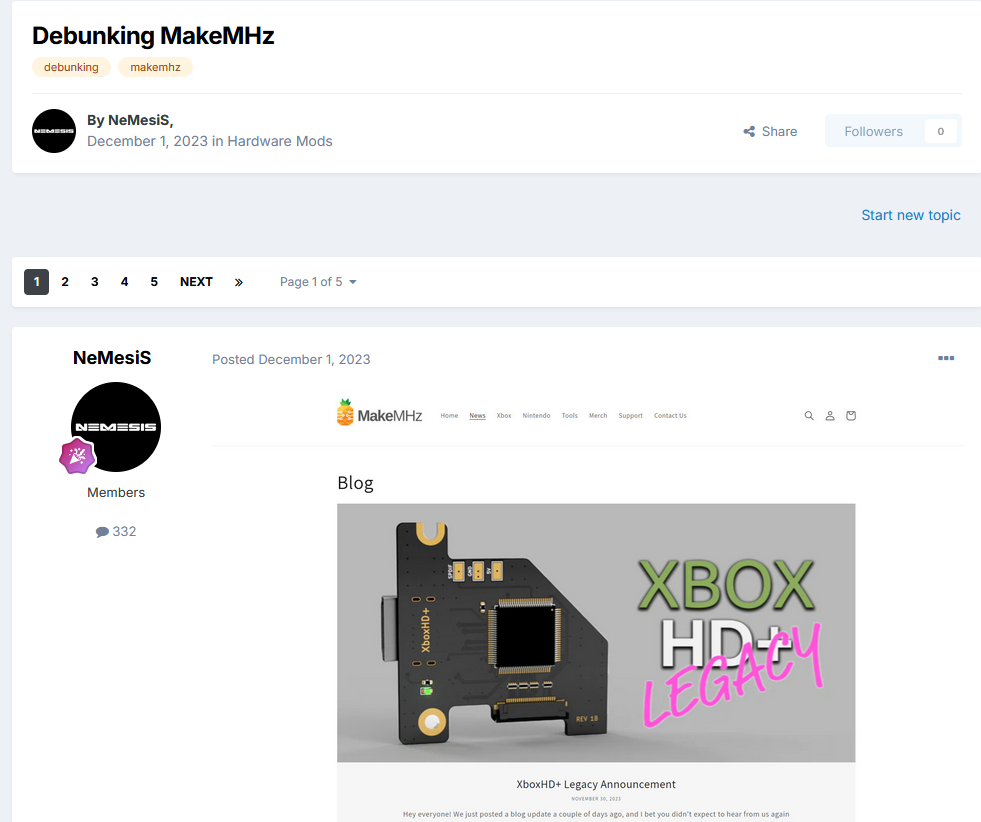
In June, a blog post titled 'Theft in the Xbox Scene' was published that made some serious accusations against members in the community. We have posted a response, in unison, on the Xbox Scene forums: https://www.xbox-scene.info/forums/topic/981-truth-in-the-xbox-scene-a-united-community-response Please archive this, share on Twitter/X, BlueSky, and your discords. The format is a forum, and discussion will be allowed, albeit moderated if it gets out of hand. We welcome questions and community engagement.
-

XycloMod: flash the on-board BIOS on v1.6
mbmontoya replied to Prehistoricman's topic in Onboard Bioschip (TSOP)
100% Done with pi pico, the GUI won't work, Python did. Greetings from Mexico. Edit. Just got a BO board ready for testing if needed. I feel like the Aladdin chip boots faster. Has anyone compared them?
-
 Sure. You just need to unpack everthing and replace the bios and repack it. But why doing it? Simply reflash the TSOP after the initial flash.
 -
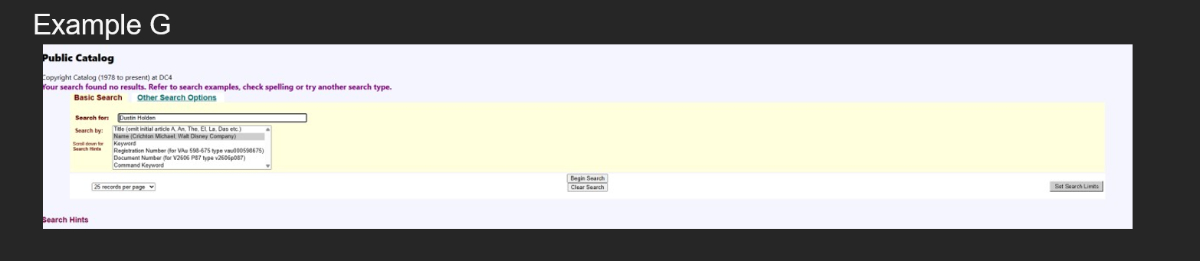
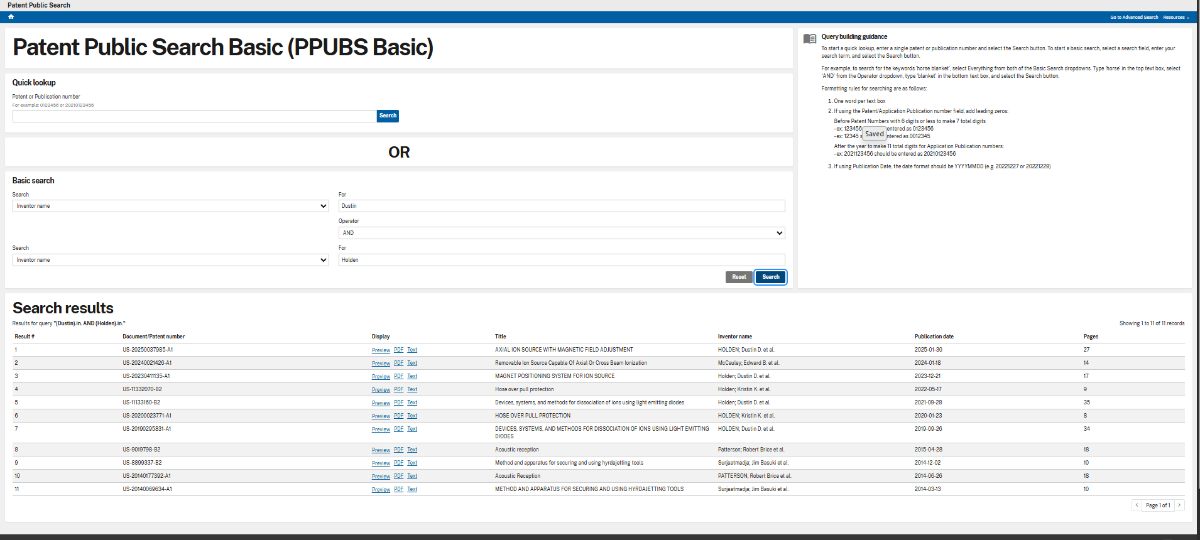
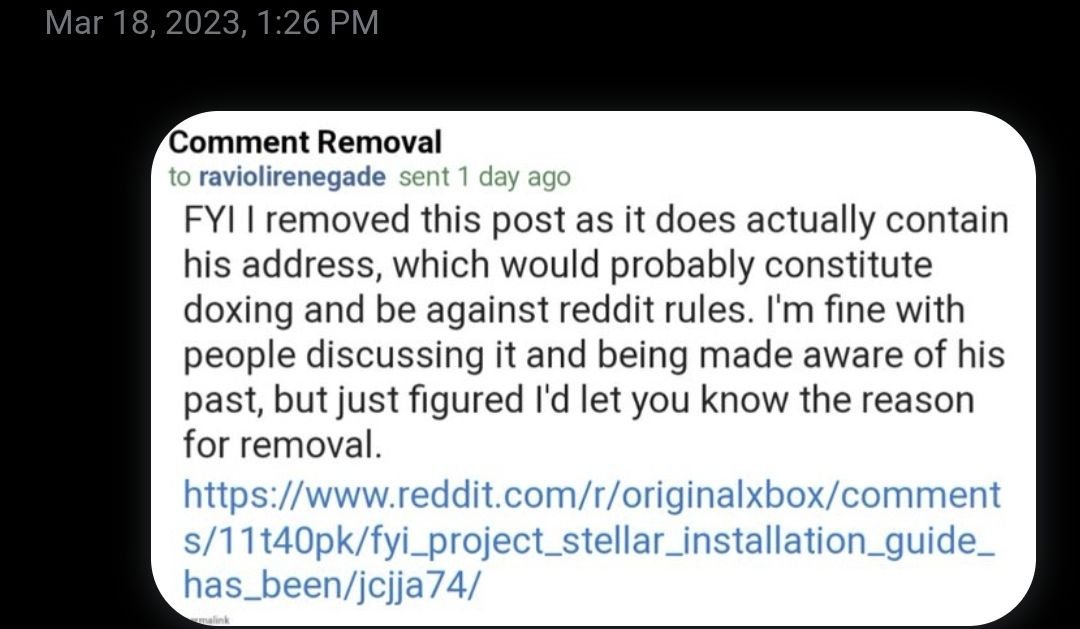
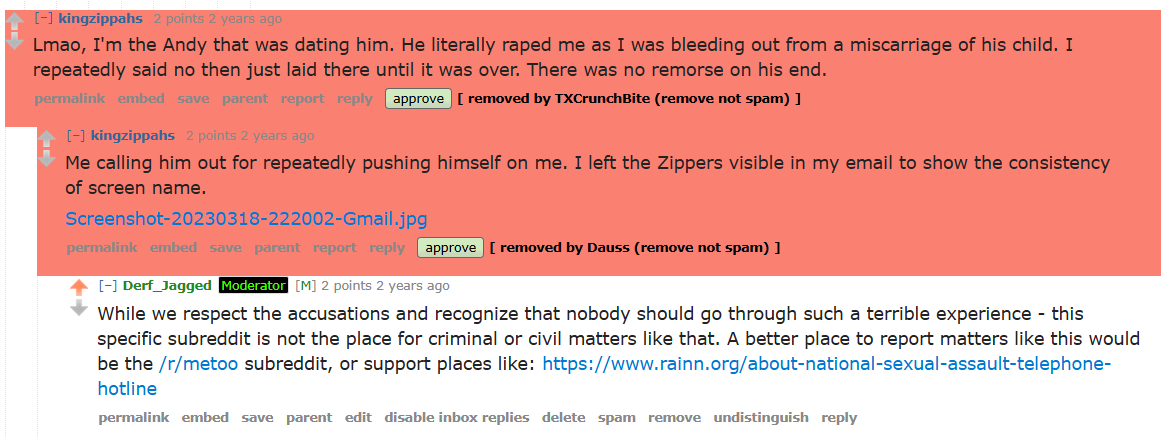
 Citations and References The following is a list of citations, screenshots, and references for the statements listed above and additional links worth noting. Twitter / X Milenko – Tepache/ConsoleMods DMCA discussion (Dec 3, 2023) – Commentary on the DMCA issued against documentation of the Tepache workaround. OfficialTeamUIX – Callout on MakeMHz deletion & block of DerfJagged (Dec 4, 2023) – Evidence of selective moderation and suppression of criticism. Harcroft – HDD unlocking & archival effort (Mar 31, 2024) – Overview of community efforts to preserve HDD data access methods. Harcroft – Vendor unlock conversation (Apr 27, 2024) – Technical discussion on unlocking Xbox drives via vendor-specific commands. SkyeHDD – VSC disclosure (Jun 1, 2024) – Public release of VSC information for hard drive research. SkyeHDD – Bypass of locking mechanism (Jun 1, 2024) – Demonstration of Xbox HDD unlocking without proprietary tools. SkyeHDD – WD Royl VSC screenshots (Jun 5, 2024) – Visual proof of vendor command use on WD Royl drives. Harcroft – Prototype P03 board photo (Jun 5, 2024) – Image of early Open-X-HD hardware. Harcroft – OXHD demo at Hamilton Game Swap (Jun 22, 2024) – Public showcase of Open-X-HD in a live demo. LoveMHz – “this is what preservation looks like” (Jun 27, 2024) – MakeMHz’s public stance on preservation, now seen in contrast with recent takedowns. GitHub PrometheOS Firmware – Team‑Resurgent XeniumOS replacement – Fully open source firmware project for Open Xenium hardware. Hermes – Team‑Resurgent attach/detach logic – ISO/CCI mounting system. OpenXenium – Ryzee119 clean‑room Xenium hardware design – Public reverse-engineered Xenium modchip design. Open X HD Board – Harcroft’s fork of XboxHDMI – Open hardware based on Ryzee's original prototype and research. XboxHDMI – Ryzee119 original firmware repo (Jan 2021) – Source for the original XboxHDMI firmware prior to forks. xenium-fw-update – MakeMHz binary patcher for Xenium – Open source, in patcher only "firmware update" that uses binary blobs to patch Xenium Firmware, injecting MakeMHz branding. Xenium‑Repacker – OfficialTeamUIX – Utility to repackage XeniumOS firmware images. xbox-hdmi-kernel-source – Kernel patch source from MakeMHz – Original patches released under GPL. ModXo – RP2040-based open modchip (GPL‑3.0) – Modern open-source Xbox modchip with fully documented firmware/hardware. MakeMHz‑support PR #10 – EatonWorks pull request – Attempt to correct modified screenshots. hddsuperclone wd_dump_mod42 – VSC dump module – Module for dumping WD firmware using vendor commands. hddsuperclone wd_royl_dump_mod02 – VSC dump module – Alternative module for ROYL-based drives. xbox-hd-plus fork – GPLv2 firmware visible – Snapshot of the repo while marked “Released under GPLv2.” xbox-hd-plus PR #13 – Ignored GPL source request (2021) – Formal request for GPLv2 source code that went unanswered. GPLv2 license removal – force‑push (Dec 2023) – Timeline comparison showing silent license deletion. Firmware binaries scrubbed – force‑push (Feb 2024) – Public firmware removed after Tepache spread. Websites & Archives ConsoleMods – Tepache guide (archived Dec 2023) – Full instructions on running XboxHD+ firmware without the Stellar Modchip. Reddit – DMCA complaint thread on /r/originalxbox – Discussion on the legality and implications of the DMCA against documentation. Reddit – Harcroft’s OpenXHD comment – Developer clarification on the origin and naming of the Open-X-HD project. Reddit – Discussion of LoveMHz's past – Ongoing concerns about MakeMHz’s past business and community behavior. Reddit – Stellar viability concerns – Community questioning the usefulness of Stellar amid compatibility issues. Reddit – Compatibility discussion on Legacy & Xenium – Troubleshooting thread on firmware/modchip interoperability. Hackaday – Open modchip coverage (ModXo) – Article featuring ModXo as a clean, modern RP2040-based modchip. Wayback – VSC Seagate unlock guide (2006) – Original guide to Seagate HDD unlocking via PC tools. Wayback – GTA San Andreas debug beta discussion (Archive 2019) – Historic thread exploring pre-release versions of San Andreas. AssemblerGames – Beware modular511 thread – Warning regarding a known scammer in the Xbox hardware community. WDMarvel demo utility (vendor commands) – Tool used to explore undocumented vendor commands in WD drives.
 -
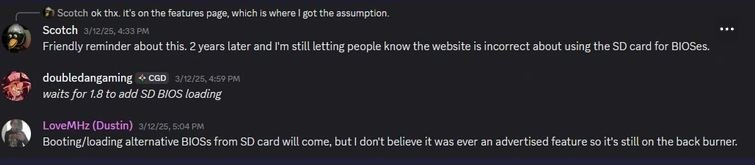
 Hi is there a way to add my own bios to flash via USB for ENDGAME cheers appreciate the work and it keeps coming 25 years later
 -
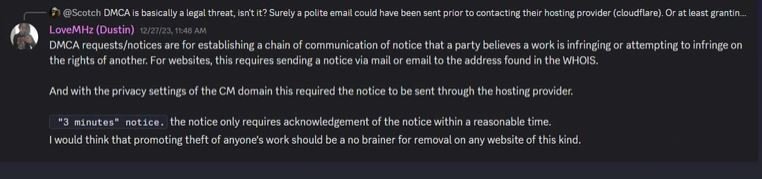
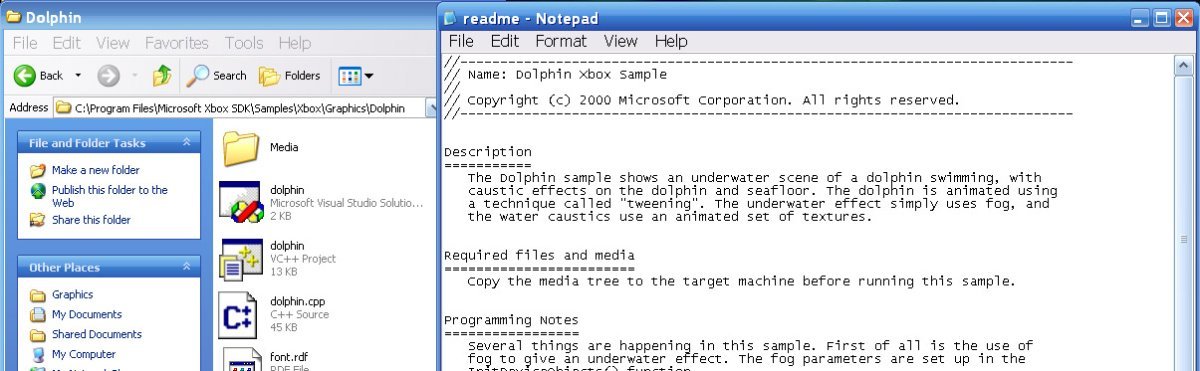
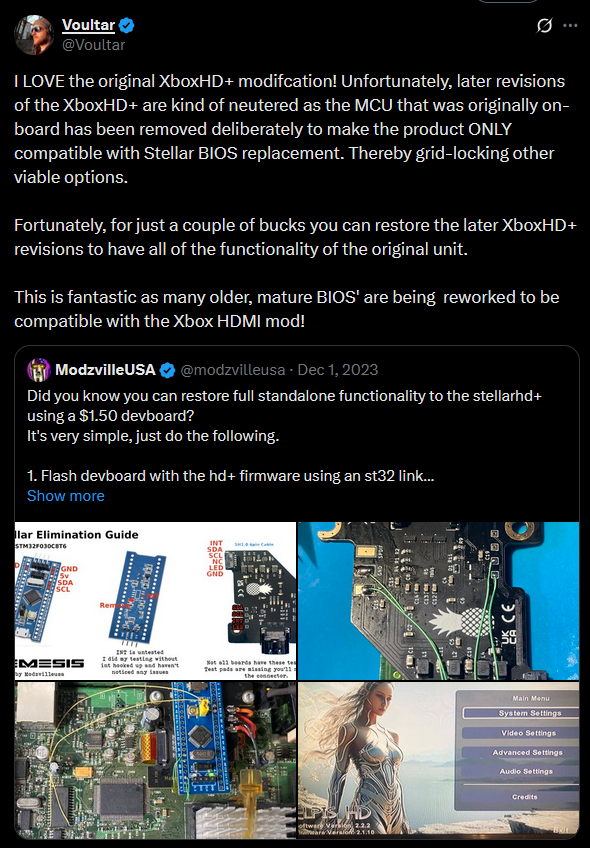
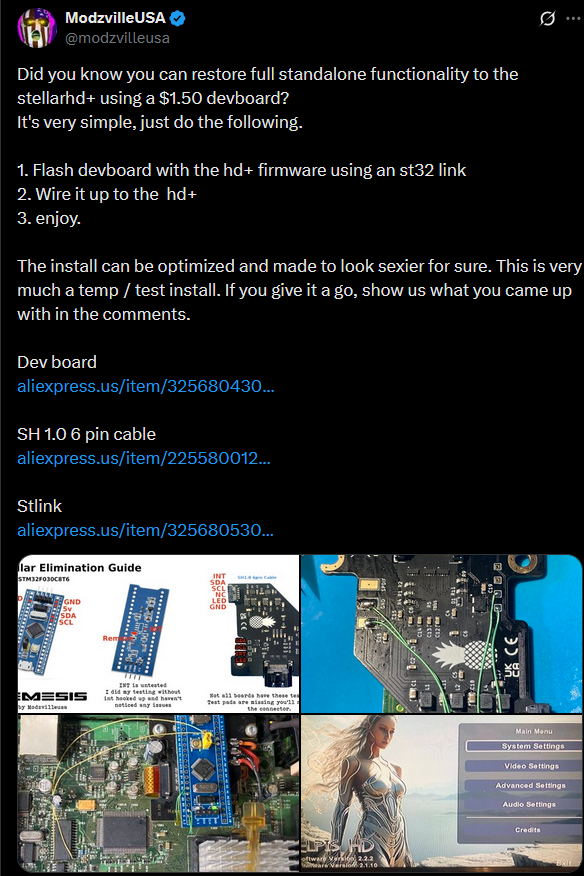
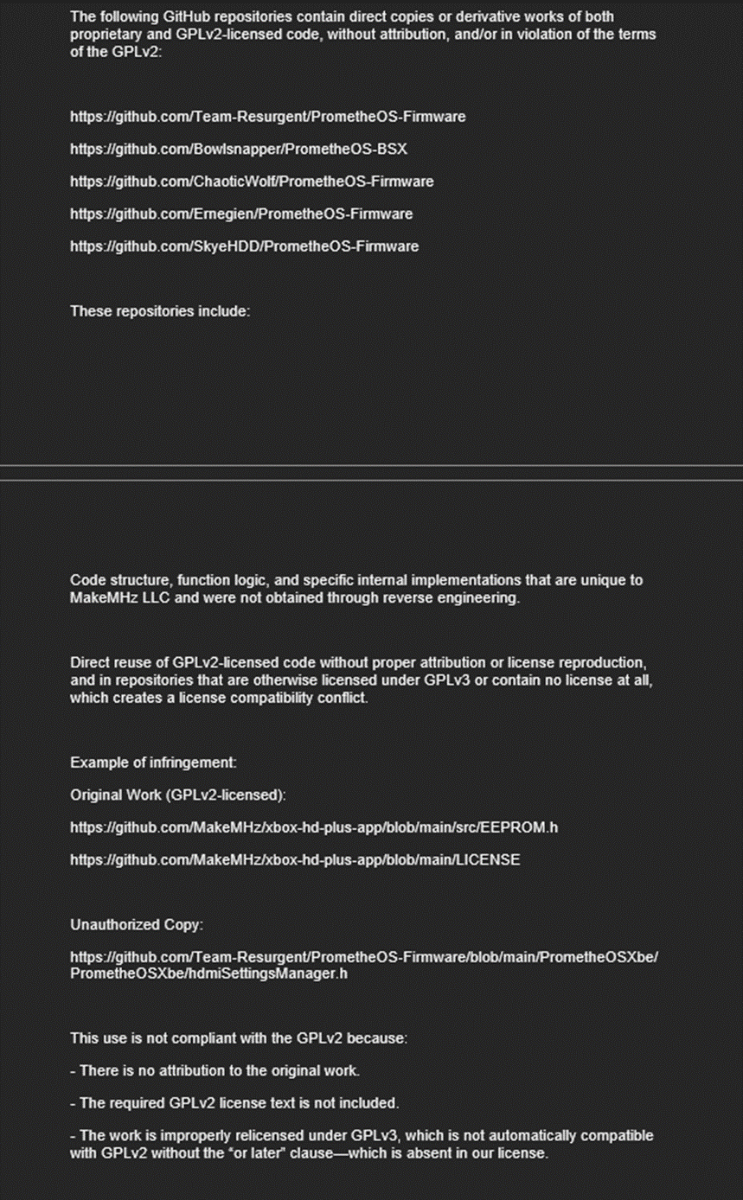
Milenko – A Personal Statement Howdy, I'm Milenko. Many of you know me as the person behind the current iteration of TeamUIX. But in light of recent events, I want to share a more personal perspective, not as a developer, but as a person who deeply values what this community represents. In 2017, I lost my father. It hit me hard, mentally and emotionally. During that time, modded Xboxes became more than a hobby, they were a way to focus, to process grief, and to reconnect with something meaningful from my past. Then came the pandemic. Stress and isolation ramped up, and like many with ADHD, I found myself hyper focused. That focus landed squarely on my old interests: Xbox modding, scripting, and small coding projects. In 2020, I dove back in, not just into the hardware, but the community. I helped rebuild parts of Xbox-Scene, collaborated with others across platforms, and watched as this corner of the internet came alive again. We reconnected lost friends. We recovered old software. We reawakened a scene that many had left behind. That experience made me deeply protective of the community, sometimes too much so. I’ve made mistakes. I've let emotions get the better of me when I felt people or projects were being misrepresented. Over the last year, I’ve made a conscious effort to separate personal feelings from public engagement. It’s a work in progress. One of those personal connections runs especially deep. Someone I care about, Andrea, was closely tied to Dustin from MakeMHz. In his old Xbox-Scene post, *Why Love Mega Hurtz*, she was mentioned as a source of support. But what wasn’t mentioned was the emotional harm and manipulation she experienced. Abuse isn’t always visible, but I saw what it did to her, and that has shaped how I respond to certain narratives. I’ve been accused of harassment. In reality, I’ve called out inconsistencies, misinformation, and attempts to rewrite history. I’m not proud of every word I’ve posted. But I also didn’t act without reason. When falsehoods affect real people and real work, silence feels like complicity. Professionally, I work in digital forensics and infrastructure security. My job is to follow threads, verify claims, and get to the truth, skills that spill into my personal projects, for better or worse. I’ve learned that being passionate doesn’t mean being reckless. It means being accountable, even when you’re angry. This scene means something to me. The work, the people, even the debates. Communities evolve. Disagreements happen. But they only move forward when we argue in good faith, and when we focus more on building than tearing down. What we don’t need are smear campaigns or revisionist histories presented as fact. That doesn’t strengthen a scene it fractures it. As it was mentioned in other statements, there was an incident involving "Tepache" and I want to to the time to address that here as I was the author of the "Tepache" guide, put together as a meme of sorts from the already circulating SEM tutorial. The Tepache Controversy, and the DMCA That Followed In late 2023, a major controversy erupted around the XboxHD+ product, its forced dependence on the Stellar modchip, and the emergence of a workaround dubbed Tepache a homebrew community led method to restore the original standalone functionality of the XboxHD+ (as seen in its prior version, XboxHD) without requiring Stellar. Timeline of Events November 30, 2023 - MakeMHz announced a commercial product called the XboxHD+ Legacy Addon, restoring standalone functionality of the XboxHD+. The timing and redundancy led many to view this as a reactionary cash grab meant to undermine and delegitimize the free SEM method being discussed on forums: MakeMHz Announcement November 30, 2023 - ModzvilleUSA publicly announced the "Stellar Elimination Module" (SEM) on Twitter/X. This DIY method demonstrated how users could decouple XboxHD+ from the Stellar modchip by using a developer dongle: Modzville Tweet December 1, 2023 - The Tepache method was formally documented and posted to ConsoleMods.org. The guide could be paired with a programming dongle, sold by MakeMHz to run the XboxHD+ firmware without Stellar. The guide did not distribute firmware. December 3, 2023 - MakeMHz issued a DMCA takedown against ConsoleMods, claiming Tepache enabled use of non-public firmware. This sparked immediate backlash, as the firmware had previously been labeled under a GPLv2 license, and the method merely restored the product’s former standalone functionality. December 3, 2023 - This tweet calling out the DMCA abuse and gatekeeping gained traction: December 4, 2023 - One of ConsoleMods's admins corrected MakeMHz’s timeline in their tweet about the DMCA and protecting their IP. They clarified that no prior outreach was made before filing the takedown. This Thread shows the correction, and the action where MakeMHz blocked Derf, the post was later removed. What Is Tepache? Despite how it was later framed by MakeMHz, Tepache never included or distributed firmware. It wasn't a homebrew device, it wasn't a clone of their hardware. It simply offered users a method using publicly available developer dongles (also sold by MakeMHz himself for use with the original XboxHD) to run XboxHD+ firmware on XboxHD+ hardware without requiring the Stellar modchip. Tepache wasn’t a random community discovery. It was created in response to a controversial product shift and a walled garden. When MakeMHz transitioned from the original XboxHD (a standalone HDMI solution) to the XboxHD+ (which offloaded key functions to the Stellar modchip), many early adopters felt misled forced to buy into a paywalled ecosystem for updates and compatibility because the developer stopped supporting the original iteration of the hardware. Tepache restored the original design: letting users run the firmware on hardware they already owned, without being locked behind additional proprietary hardware. GitHub History Contradicts MakeMHz’s Claims Following the backlash, GitHub activity revealed a series of force-pushes and retroactive edits seemingly intended to rewrite the public record: Fork of Xbox-HDPlus-App - Captured with markings of GPLv2. Ignored GPL Source Request (2021) - A user formally requested GPLv2-licensed source code, as required by license. The request was never answered, and later force pushed away. December 2023 – Removal of GPLv2 Licensing Line This language existed for years before being quietly removed after the Tepache guide gained attention. February 2024 – Binaries Scrubbed - The public firmware files were deleted from the repo. This removal occurred months after the DMCA further undermining the “not publicly available” claim. The “Typo” Excuse Doesn’t Hold When challenged, MakeMHz claimed the GPLv2 license declaration was a “typo.” But this is contradicted by: The presence of the license line for over 3 years A 2021 pull request requesting GPL sources Force-pushes done after Tepache emerged, not as a proactive correction Summary Tepache enabled previously supported hardware freedom, not piracy and required the purchase of hardware, and the use of freely available software, by MakeMHz. Firmware was hosted publicly, and available under MakeMHz’s own GPLv2 claim. The DMCA was used to suppress community documentation, not protect IP. MakeMHz’s GitHub history contradicts the public narrative they later tried to spin. This incident illustrates how licensing and copyright claims have been weaponized after the fact, to lock down innovation and erase prior openness only once it’s no longer profitable. As many others, I have no issue with Dustin/LoveMHz/MakeMHz protecting the products they create, the issue becomes an issue when the narrative is changed simply to justify their own actions and hypocrisy. It is very clearly a do as I say, not as I do, mentality at the head of MakeMHz LLC. Creators in the community are expected to adhere to certain rules, and arbitrary goalposts are constantly moved while someone makes claims that entirely impossible to prove, as their code is not available to the public. That's completely fine, they don't owe us anything. But.... Every single one of the projects that MakeMHz has claimed is reverse engineered, has had its source available for over 20 years. From the kernel, to the Dolphin sample. It is in my personal opinion, that they use these phrases simply to market their products. Their gits are full of "open source" things, that aren't open source, they're open source wrappers for binary patches. Or, they're simply documentation hubs for their products. Lets touch on the intricacies of the GPL, and how that affects BINARY RELEASES. GPLv2 Still Applies Even If the Repo Was Scrubbed If a binary was publicly released and labeled “Released under GPLv2,” that license still applies, even if the author later: Deletes the repo Force pushes commits Removes the GPL language Claims it was a “typo” The GPLv2 is irrevocable once granted. Users received the binaries (or even saw the public claim) and are still entitled to: The source code The right to modify and redistribute All freedoms granted under the GPLv2 License terms cannot be retroactively revoked this is backed by GPLv2 Section 3 & 6 and the FSF’s own FAQ. “Once a program has been distributed under the GPL, recipients can rely on that license.” — Free Software Foundation Even scrubbing Git history doesn’t erase the legal obligation. If you have screenshots, archives, or forks showing the original GPL notice, that’s more than enough to enforce your rights. The argument that the source code was not released had no barring on the fact the binaries were, they were labeled GPLv2 for years and that makes those binaries, and thus the entirety of the firmware up until that point, GPLv2. If the Tepache guide did include these firmware's, they were well within the license agreement established in the GPL. This holds true for anyone receiving threats of legal recourse for providing those firmware's as well. I’ve said my piece. Thanks for listening.
-
 Hello, My name is Lonnie Mason, I am the sole proprietor of “LonWay Technologies” a small Retro Mod shop based in the United Kingdom. I am writing this public statement in response to recent actions taken against small businesses within the Retro Xbox Modding/Enthusiast community. On 22 June, 2025 “MakeMHz LLC” initiated a DMCA takedown request targeting my OpenXenium listing on Etsy, alleging that my listing infringed on the Intellectual Property rights to “Project Stellar”, with no specific details given as to what was allegedly infringed. I would like to make it known, that at no point did “MakeMHz LLC” make any attempt to communicate with me to discuss any concerns related to the OpenSource products that I offer before initiating the DMCA takedown. I find this behaviour both unacceptable and unprofessional I firmly believe in good faith that there is no legal basis for this claim, and that this has nothing to do with the Intellectual Property of “MakeMHz LLC”. I personally and professionally take matters of copyright very seriously and respect the rights of all creators. However, I believe that this claim may represent a misuse of the DMCA process in a manner that adversely affects small businesses operating in good faith within this industry. A Call for Calm, Professionalism, and Community Unity I'm deeply saddened by this recent turn of events. What began as a hobby tinkering with and selling mods has grown into the business I’m proud to run today. I take great pride in the work that I do, and I feel truly privileged to be part of this community. I’d like to take this opportunity to call for calm within the community. I know we can be passionate and outspoken at times, and we may not always agree and that’s okay. What matters most is that we maintain a respectful, professional environment. Please, take a moment to think before you type behind every screen is a real human being. Lastly, I want to sincerely thank everyone who has reached out with messages of support. The response has been overwhelming, and I’m truly grateful. Thank you for your time. Sincerely Lonnie Mason Sole Proprietor Of LonWay Technologies LonWay Technologies – Retro Mods & More © 2025 LonWay Technologies LonWay Technologies - Public Statment.pdf
-
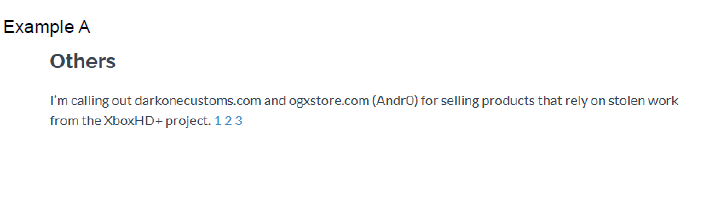
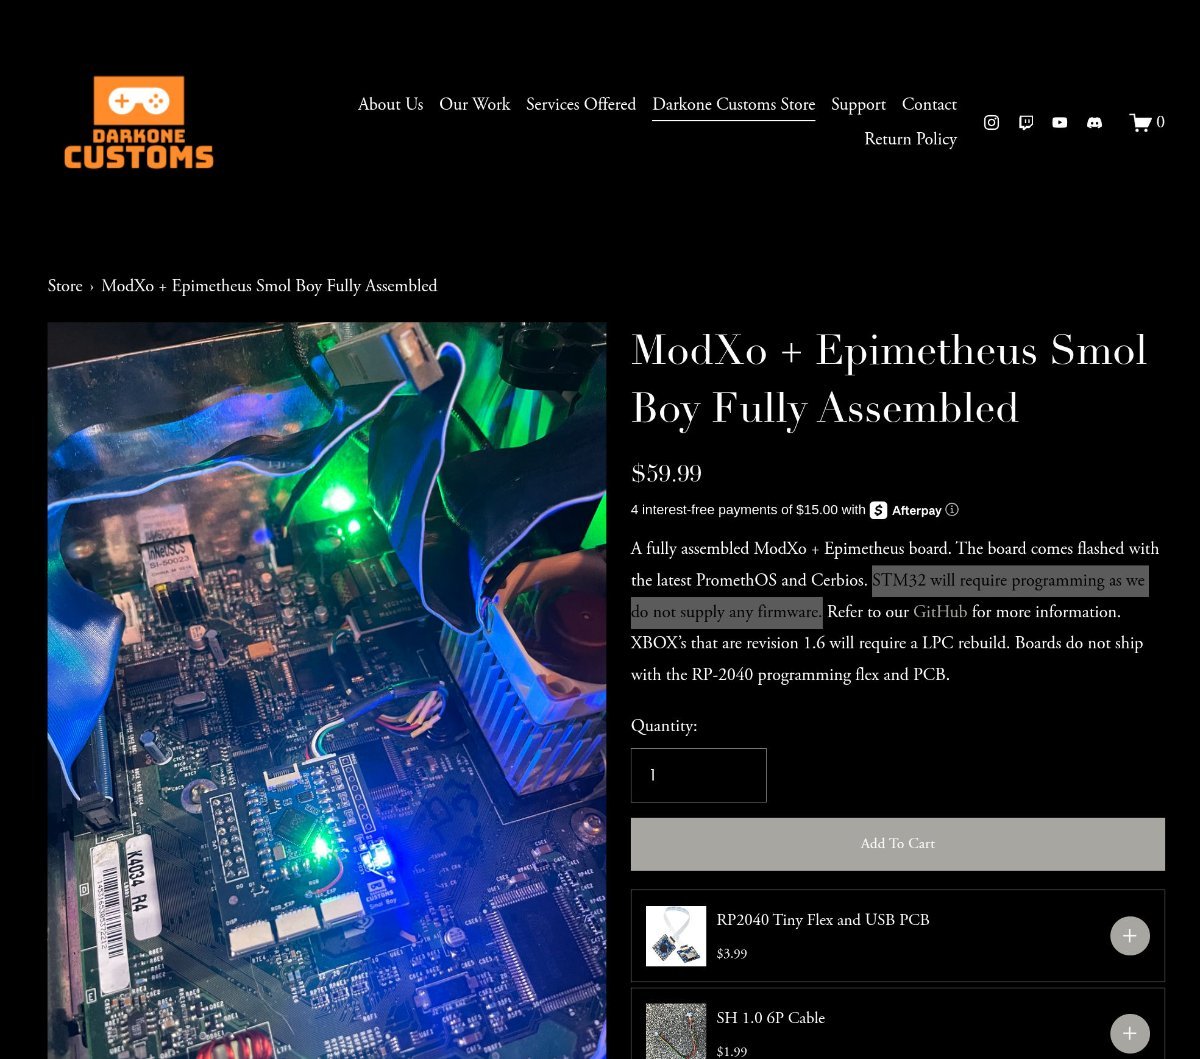
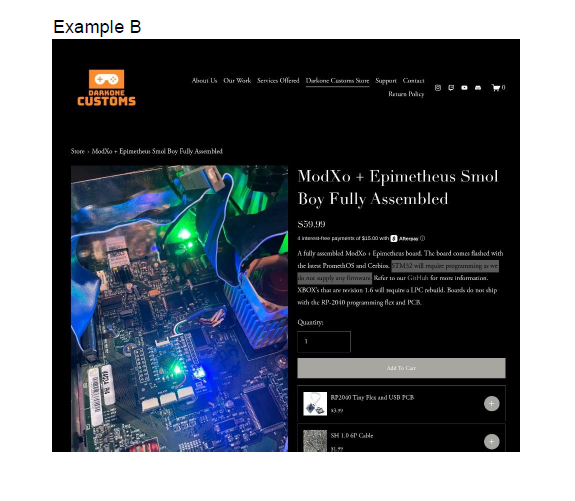
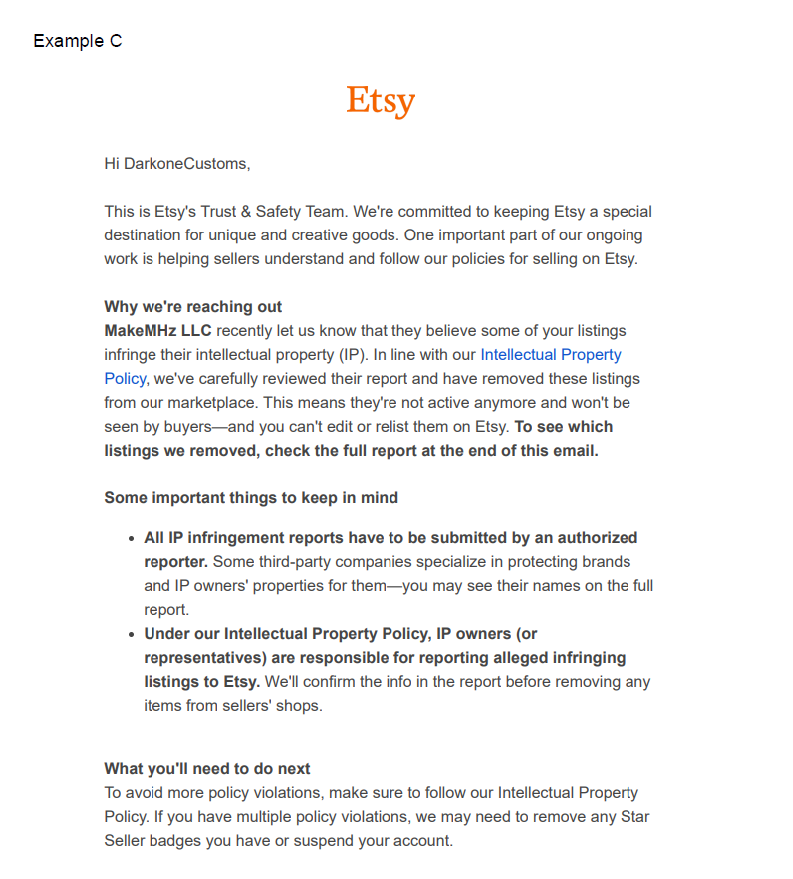
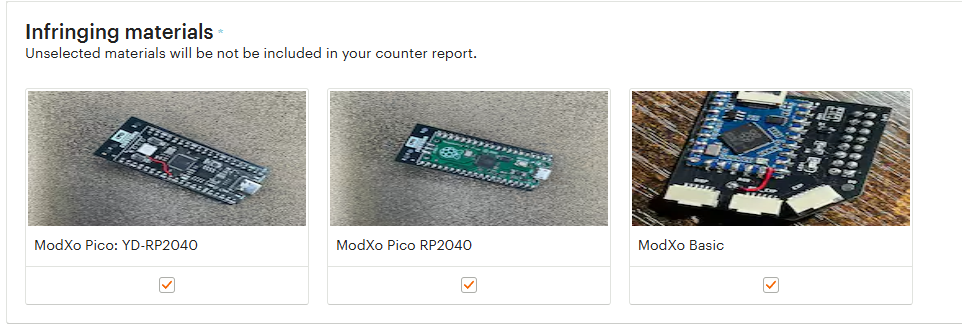
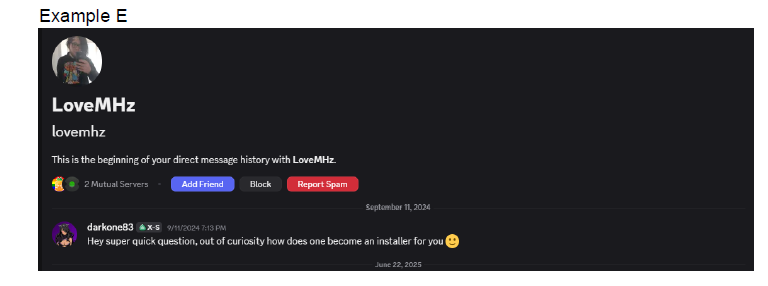
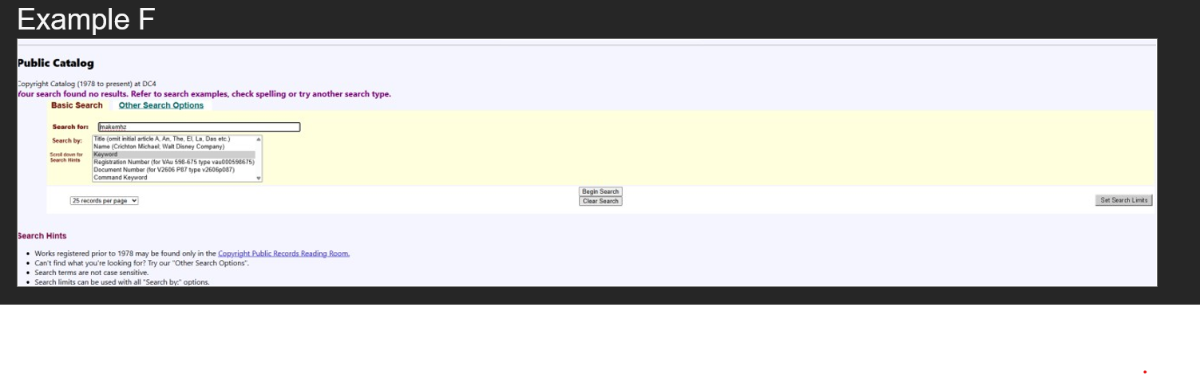
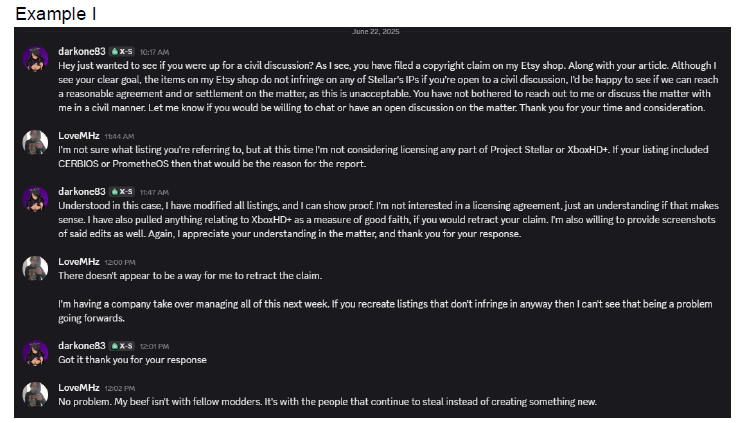
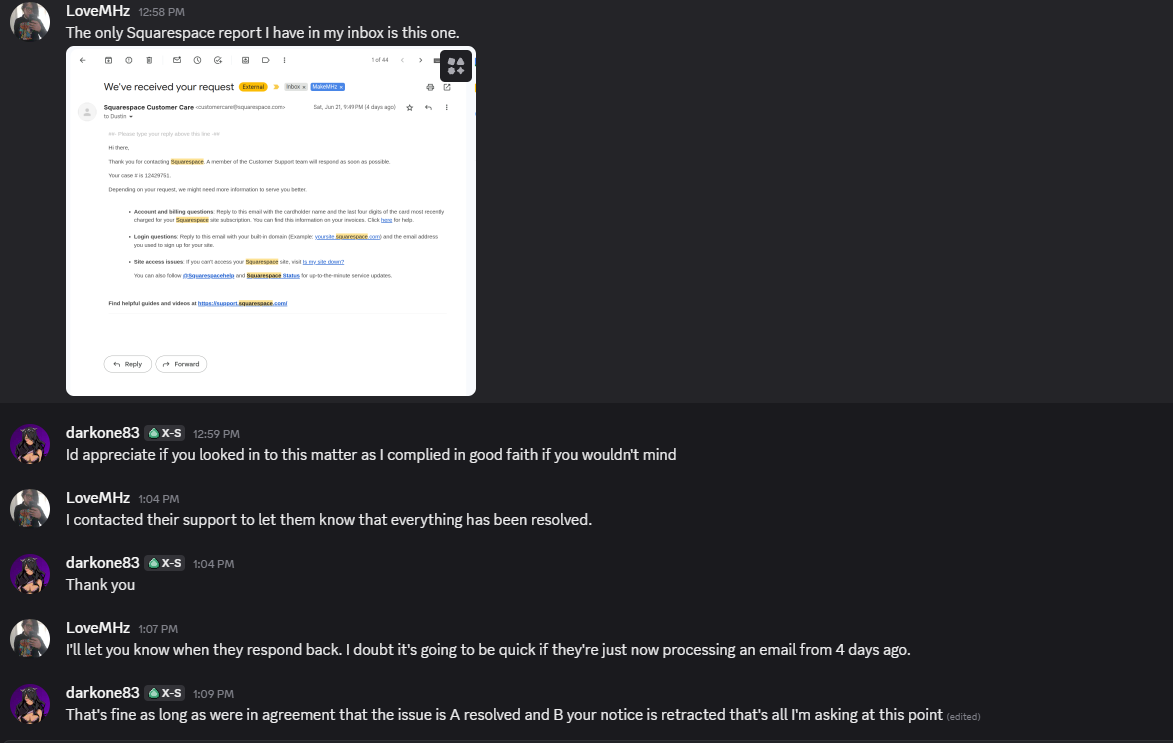
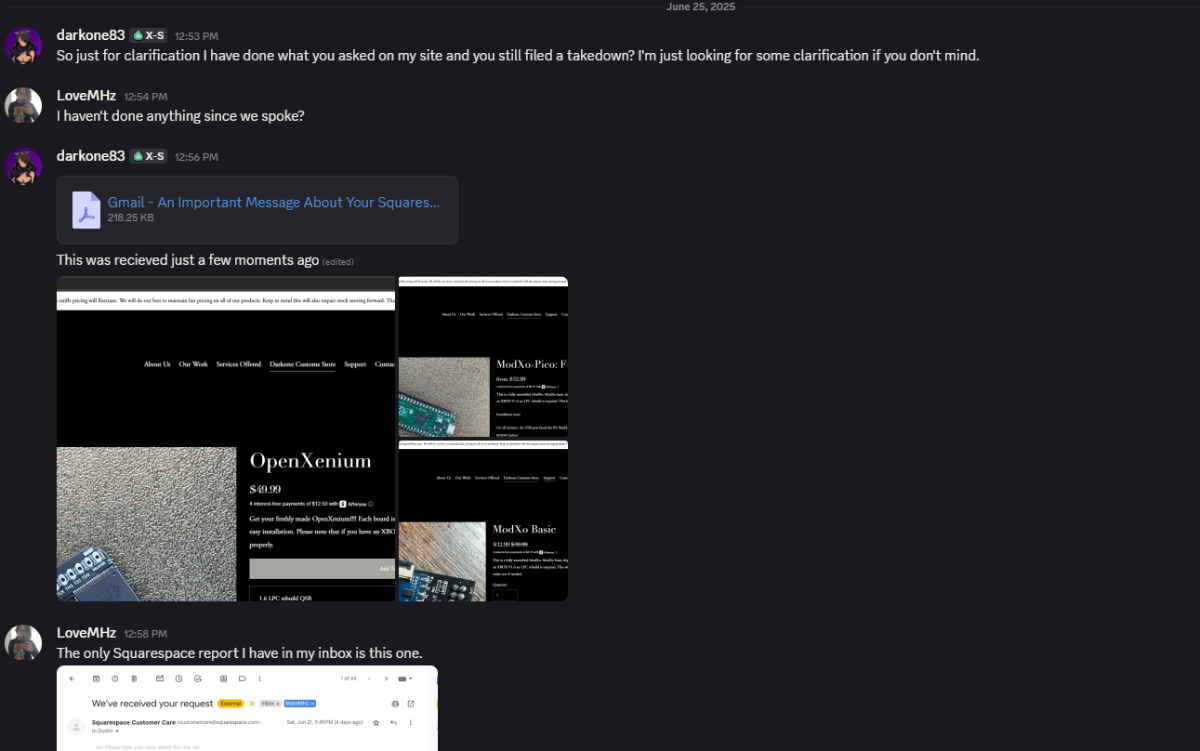
Darkone83 Statement Regarding Recent Allegations by MakeMHz To the Xbox Community, Colleagues, and Interested Parties: I am known online as Darkone83, and I am the owner and operator of Darkone Customs. I am writing in response to recent public allegations made by LoveMHz of MakeMHz regarding supposed intellectual property violations within the Xbox enthusiast and modding community. On **June 21, 2025**, MakeMHz published a blog post titled “Theft in the Xbox Scene - Part 1,” which named my business among several others as contributors to the alleged theft of MakeMHz intellectual property. Specifically, my product referenced (Example A) was the “ModXo + Epimethus Smol Boy Fully Assembled”—a device which combined a ModXo board with an STM32 microcontroller. In the image provided by MakeMHz (Example B), an Xbox HD+ is depicted running on this board. I wish to clarify several important points regarding this product and my business practices: - No Firmware or Code Provided: At no point have I supplied any firmware or code for this product. Out of respect for creators and to avoid any question of piracy or theft, my product listing clearly stated: “STM32 will require programming as we do not supply any firmware.” (Example B) This statement was made in good faith and in the spirit of community responsibility. - No Sales or Distribution of Infringing Material:* Over the approximately 1.5 years that this listing was active, not a single unit was sold. Furthermore, I have never distributed any firmware, code, or materials related to the Xbox HD+, Project Stellar, or any similar proprietary project. - Commitment to Community Values: Like many in the scene, I enjoy tinkering and believe in the right to explore and customize hardware that I lawfully own. However, I firmly oppose unauthorized distribution of proprietary code and always strive to operate within legal and ethical boundaries. On June 22, 2025, I received a DMCA takedown request targeting three of my Etsy listings, as shown in the referenced image (Example C, D). This action was initiated by MakeMHz, claiming that my listings infringed on their rights relating to Project Stellar. It is important to note that prior to this takedown and before the aforementioned blog post MakeMHz never contacted me directly to discuss any concerns or to seek a resolution. In fact, I had previously reached out to MakeMHz myself to inquire about becoming an authorized installer of their products, but I received no response. (Example E) Rather than engaging in dialogue or seeking clarification, MakeMHz proceeded to disrupt my business operations with what I assert are unsubstantiated and broad claims. Their blog post references decompiled binaries and “blobs,” but does not provide any concrete, line-by-line evidence of code theft or plagiarism regarding my work. Regarding Legal Claims: According to the U.S. Copyright Office and U.S. Patent Office (Example F, G, H - As of this writing, MakeMHz LLC does not hold any patents nor any copyright registrations for the projects in question. - There has been no demonstration of legal ownership over any code or material referenced in their claims. Despite this, I attempted to open a direct and civil line of communication with LoveMHz (Example I) to resolve any misunderstandings. The response I received indicated an unwillingness to engage in constructive dialogue, instead proceeding with actions that I believe are both damaging and without merit. --- Update (June 25, 2025): Ongoing Squarespace/DMCA Dispute On June 25, 2025, I received an official notification from Squarespace regarding a DMCA takedown request filed by MakeMHz LLC against my website, darkonecustoms.com . The notice alleged that several of my product listings were infringing upon their proprietary software, specifically relating to Project Stellar, and requested their removal. In compliance and good faith, I promptly responded to Squarespace, reiterating that my products do not contain or distribute any firmware, code, or other material belonging to MakeMHz LLC. I also submitted a formal DMCA counter-notification in accordance with Section 512(g) of the DMCA, clearly outlining that all affected products are open-source hardware or assembled boards, and that no unauthorized software is provided or included. At this time, the issue remains unresolved. While I have reached out to all relevant parties including Squarespace, and have communicated directly with LoveMHz (see attached email and chat records) no resolution or retraction of the takedown notice has yet occurred. I am awaiting further response from Squarespace regarding the reinstatement of my listings and the outcome of my counter-notification. I remain open to a good-faith dialogue in hopes of resolving this dispute fairly and transparently. (Example J, K) --- A Call for Professionalism and Community Spirit I am deeply disappointed by these events. I joined the Xbox community out of a passion for technology and a desire to collaborate with others who share similar interests. Actions such as these public accusations without substantiation, and disruption of small businesses do not serve our community. Instead, they foster division and hinder the spirit of cooperation that has allowed our scene to thrive. I want to be clear: I harbor no ill will toward MakeMHz or anyone else involved. My only request is for transparency and for all parties to act in good faith. I urge everyone reading this to refrain from directing hate, harassment, or malice toward any individual or group. Instead, let us work together to resolve disputes respectfully and maintain the integrity and inclusivity of our community. Please see all reference images and documentation below. --- Thank you for your attention, Darkone83 Owner, Darkone Customs
-
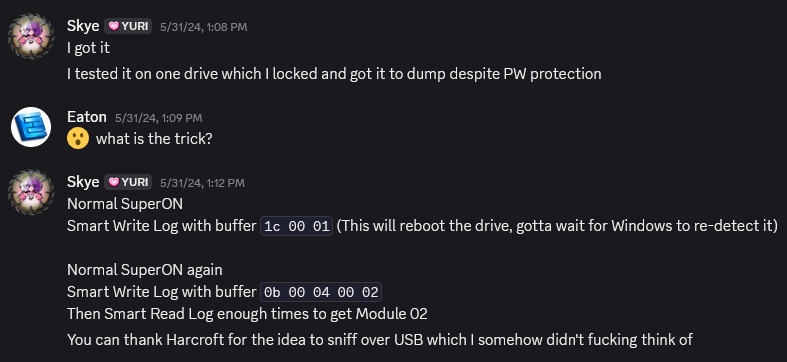
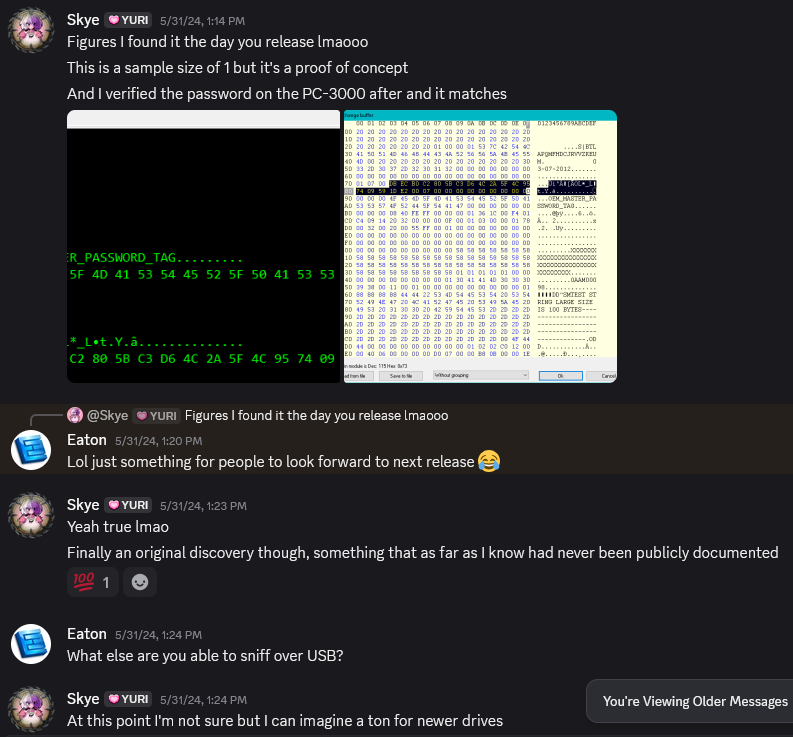
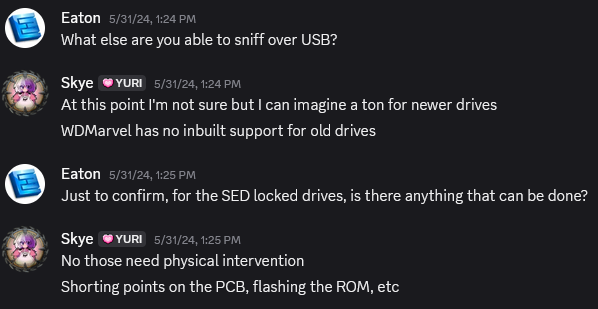
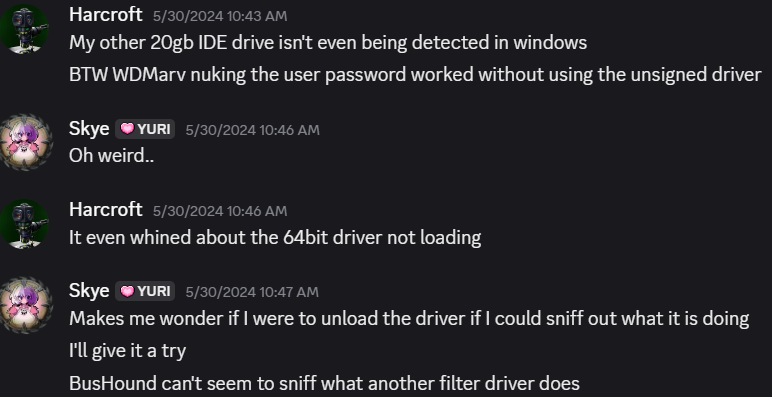
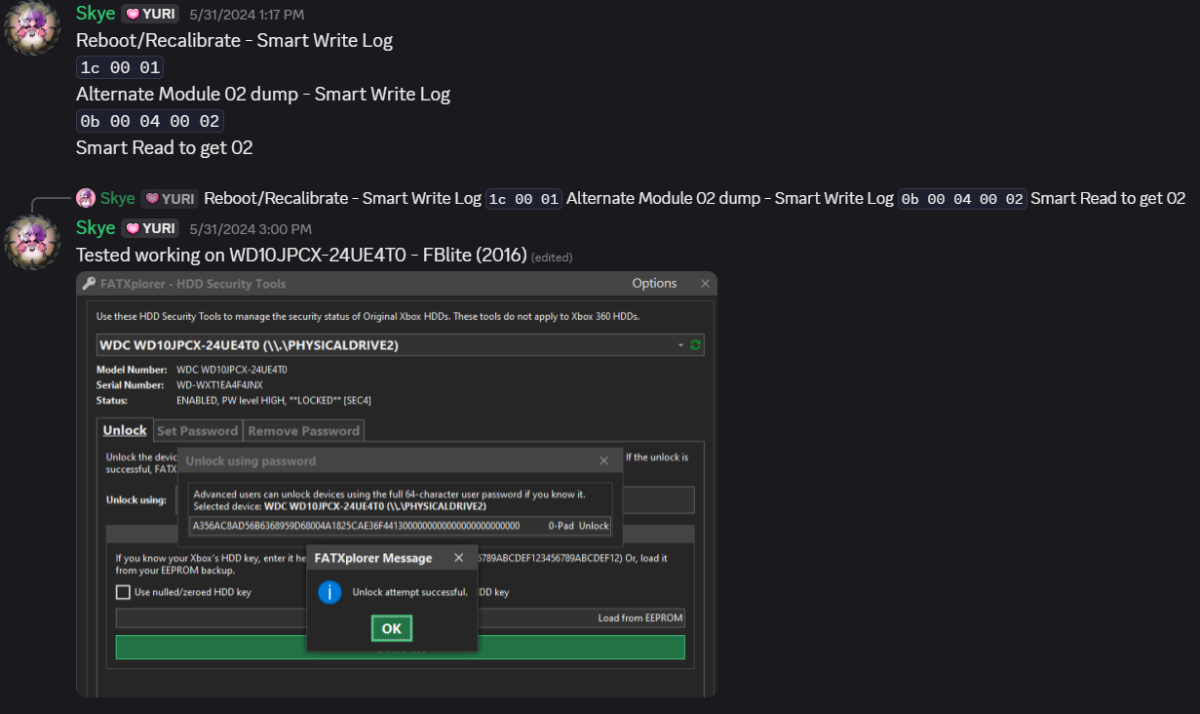
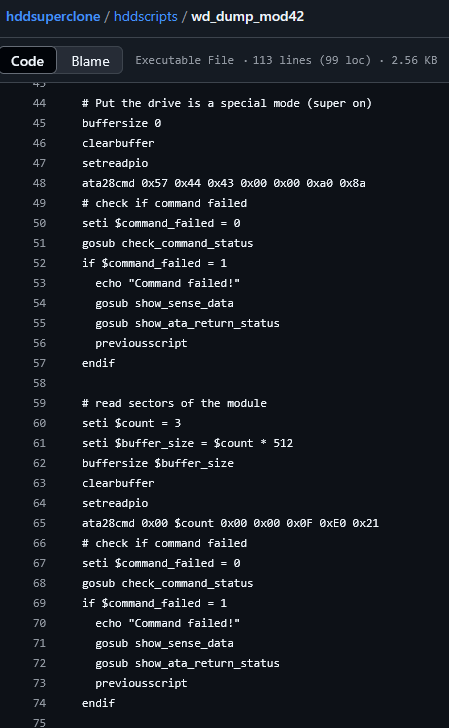
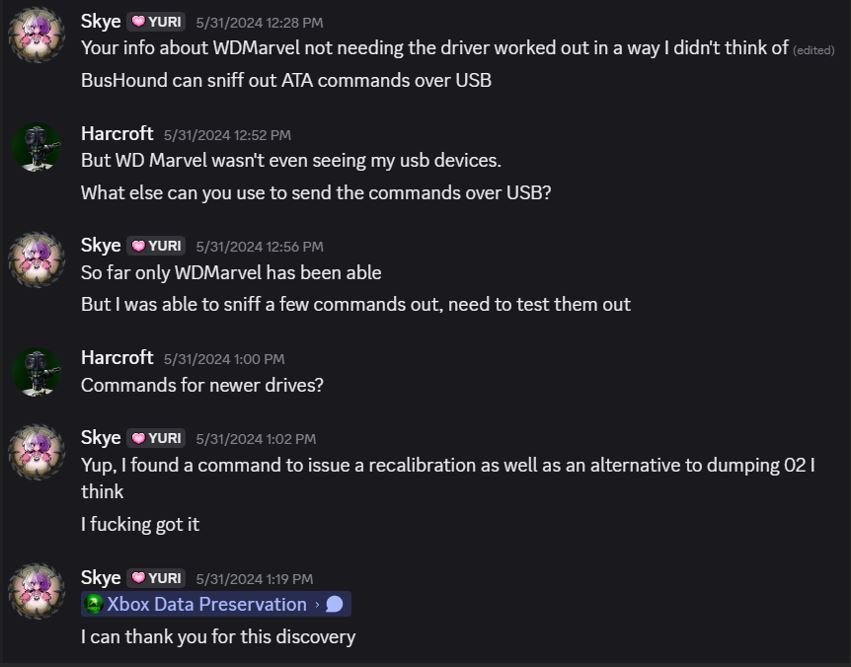
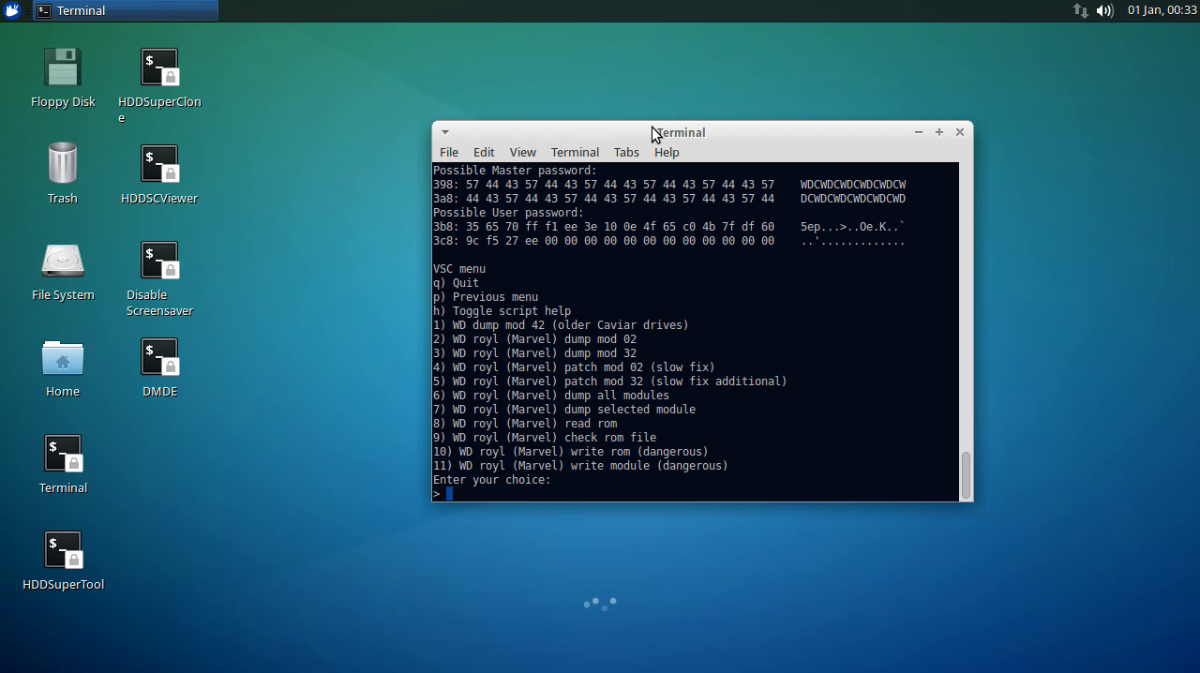
Statement By Skye Hi, my name is Skye and I'm a Data Recovery Engineer. Recently there was a "callout" post made by Dustin Holden--aka LoveMHz, proprietor of MakeMHz, creator of the Stellar Modchip and the XboxHD+ HDMI mod. Included in the post was a section heavily implying but not outright saying that both myself and Eaton (the developer of FATXplorer) stole code related to unlocking original Xbox hard drives and implemented the functionality into FATXplorer. This claim is demonstrably false-- The method used by FATXplorer is an original implementation using a modified copy of smartctl, and the Vendor Specific Commands (VSCs) for dumping SA Module 42 on Western Digital branded OG Xbox hard drives have been publicly available predating Stellar's implementation. Additionally, extra functionality for dumping SA Module 02 on newer Western Digital hard drives manufactured after 2006-2009 was independently reverse engineered by myself from an unrelated Windows based software called WDMarvel. The aforementioned extra functionality is not present in Stellar, and is only present in PrometheOS and FATXplorer. I have publicized the VSCs on my social media accounts in an effort to have complete transparency and because of my dislike of gatekeeping code behind a price tag. The post also implies that the ability to dump passwords on locked OG Xbox Seagate hard drives was stolen from Stellar and implemented into FATXplorer. This is patently false as FATXplorer has no ability to dump passwords on locked Seagate drives which are locked using a User Password on MAX Security mode through use of an EEPROM key wherein said EEPROM key is lost. The only methods for doing that involve using PrometheOS, using publicly available Terminal commands via a USB UART adapter connected to the hard drive, or Stellar. Proof of my research and discovery process will be included as screenshots with this post, along with links to my Twitter related to the discovery process. If there are any doubts as to the legitimacy of my claims, the process for retrieving the aforementioned VSCs for newer Western Digital hard drives is trivial enough that I can recreate the entire process in a vacuum. https://twitter.com/SkyeHDD/status/1798350788324098354 https://twitter.com/SkyeHDD/status/1796884598279864424 https://twitter.com/SkyeHDD/status/1796885259843203073 https://github.com/thesourcerer8/hddsuperclone/blob/main/hddscripts/wd_dump_mod42 https://github.com/thesourcerer8/hddsuperclone/blob/main/hddscripts/wd_royl_dump_mod02
-
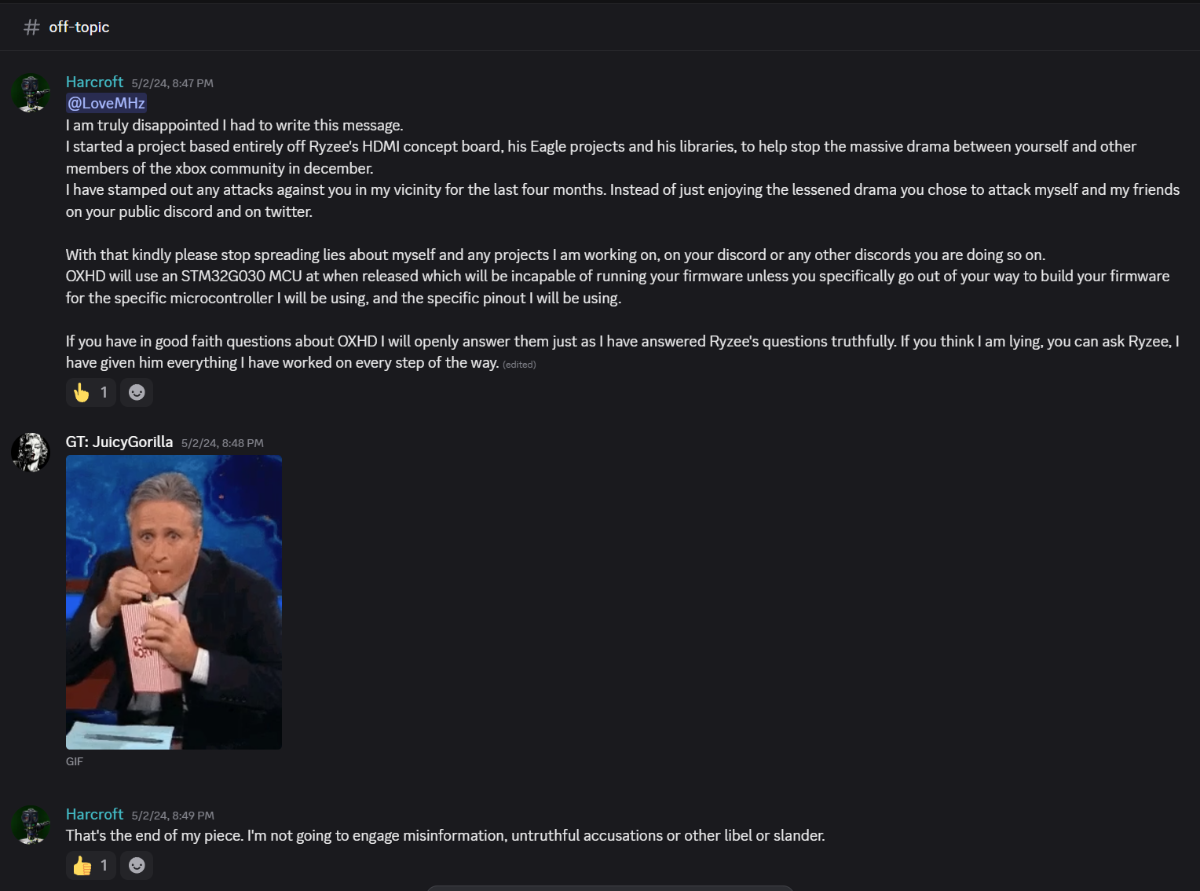
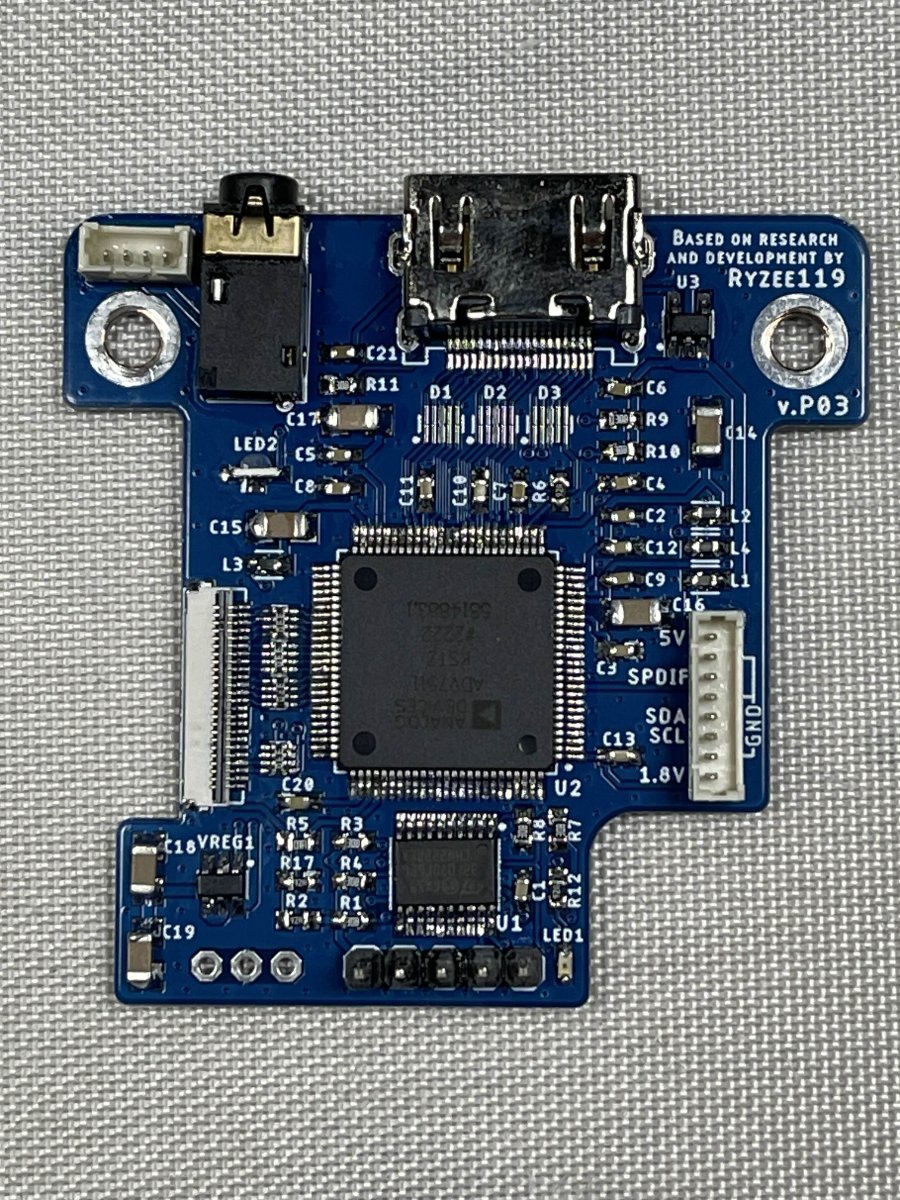
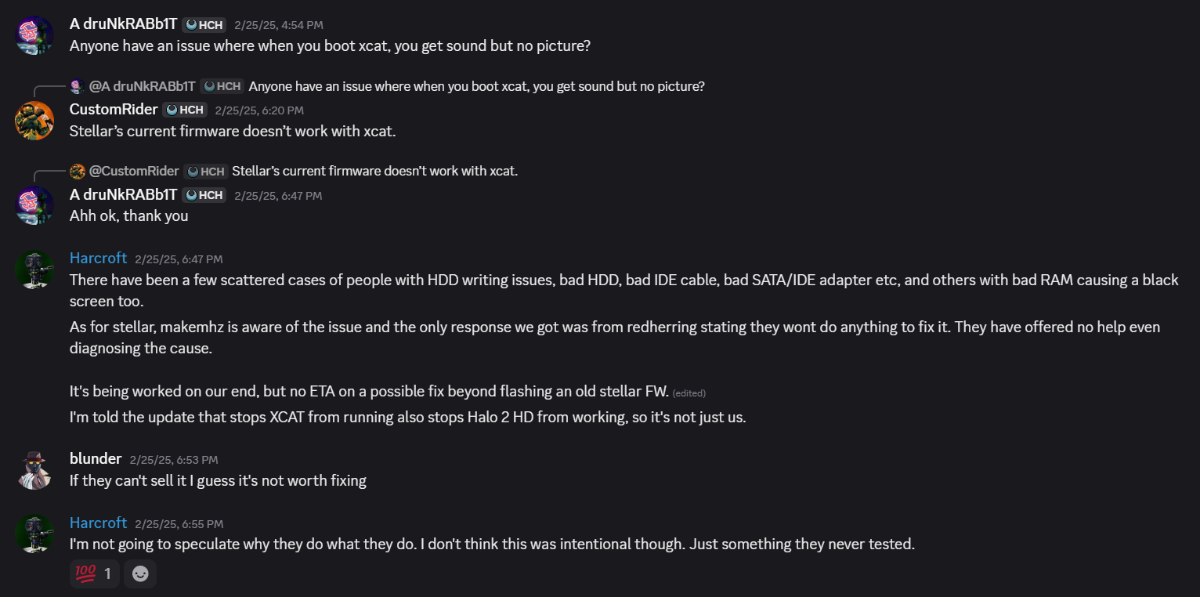
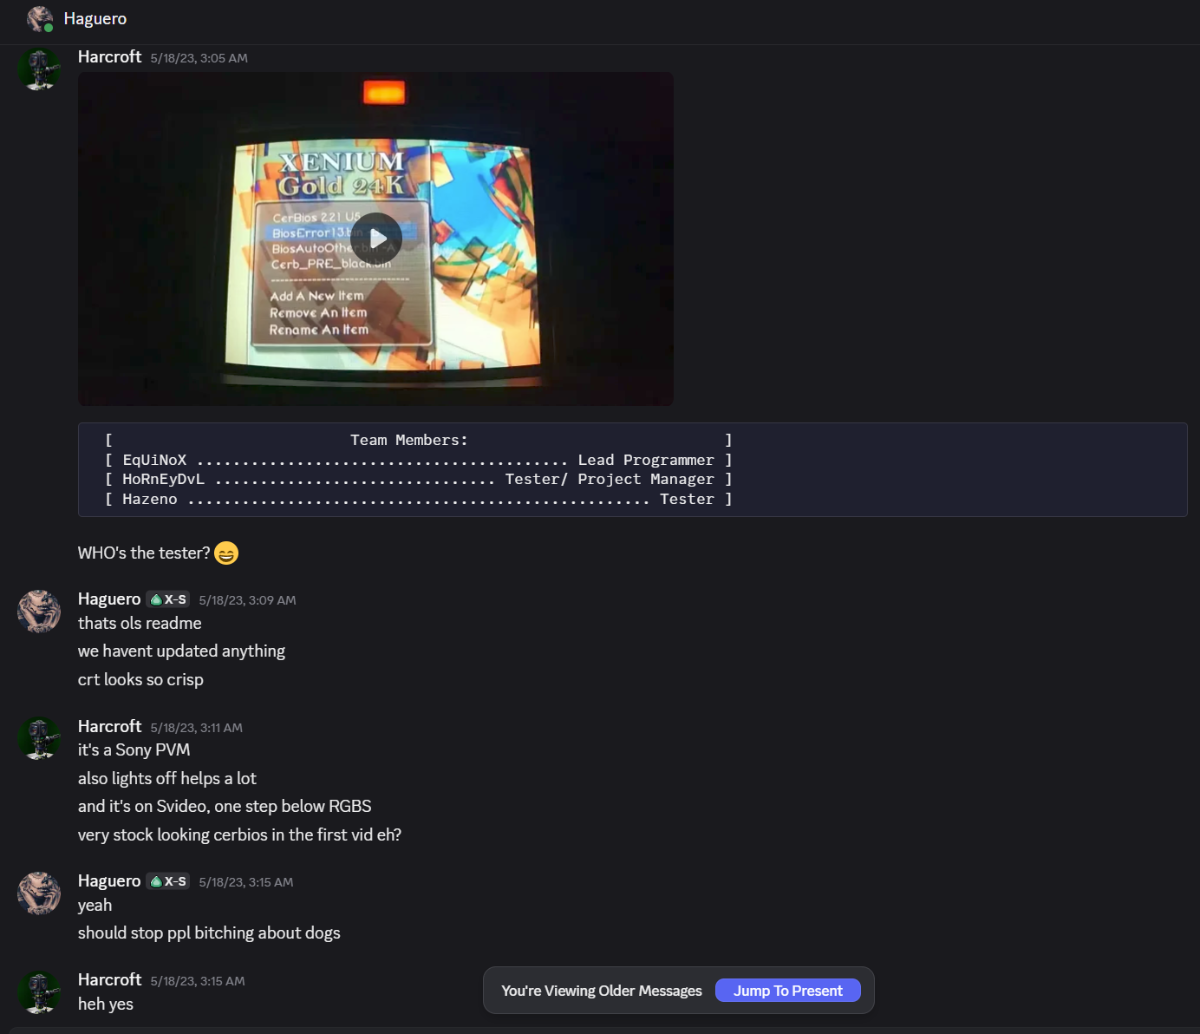
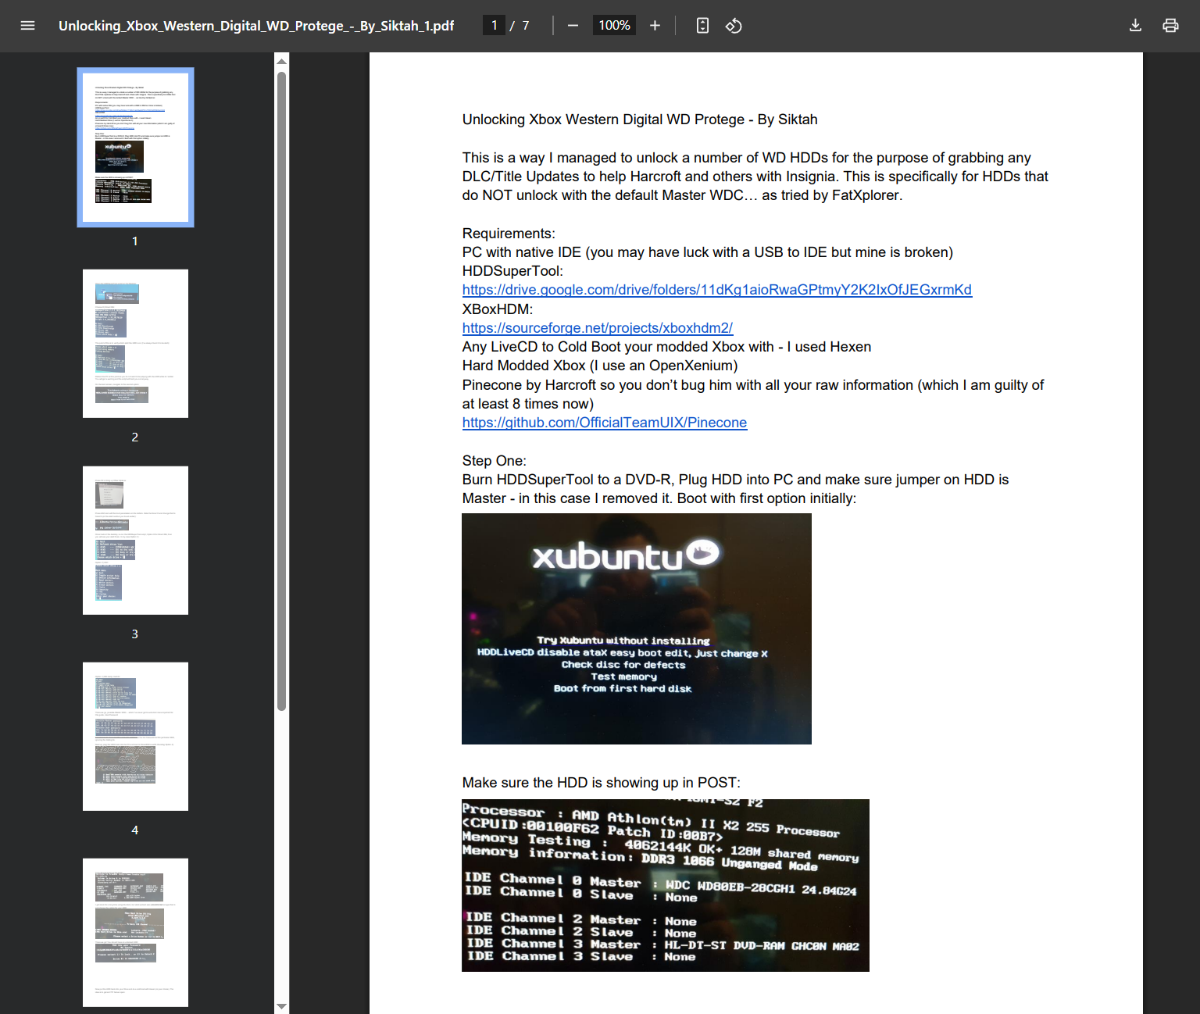
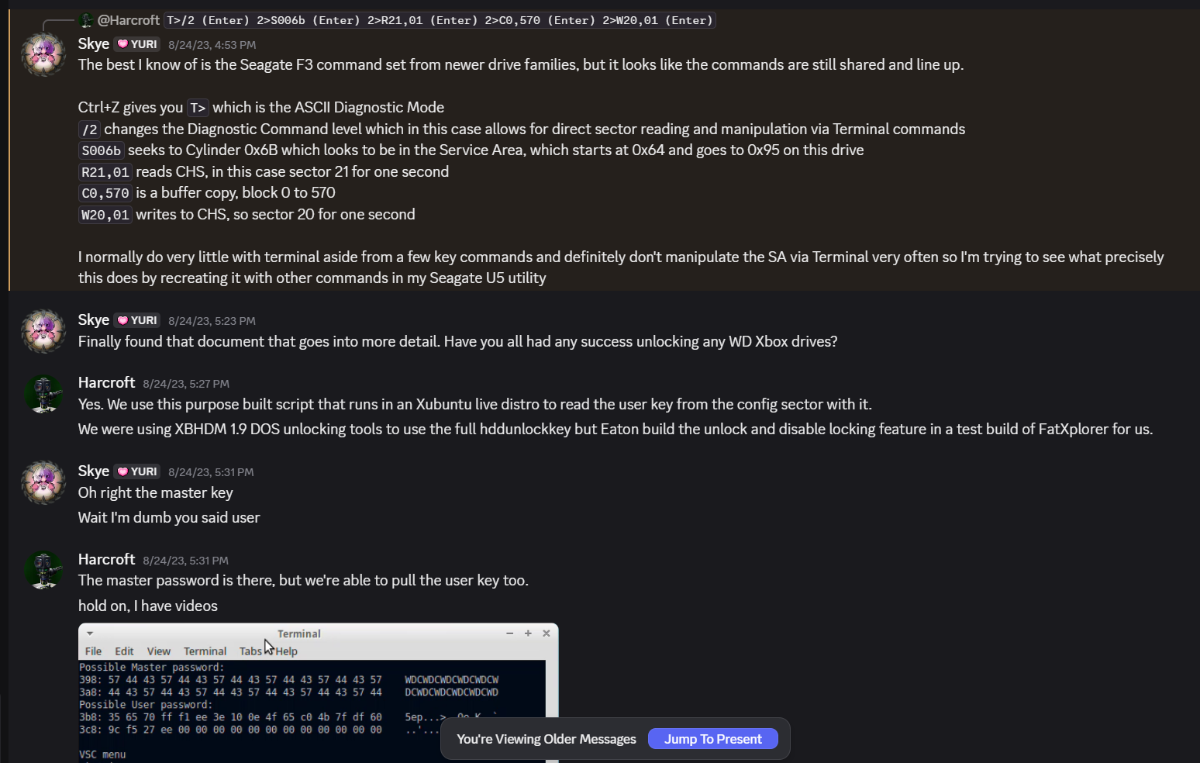
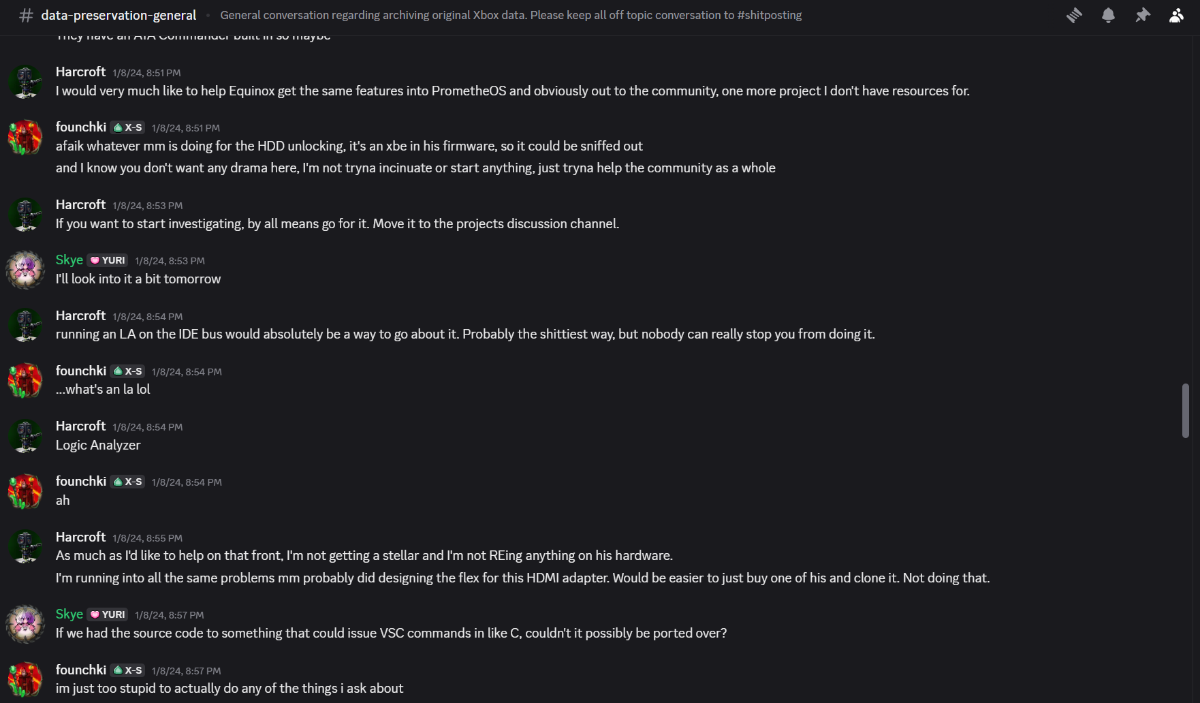
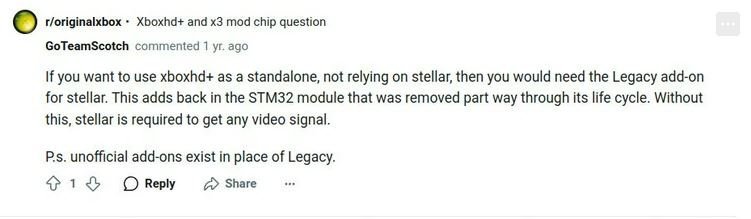
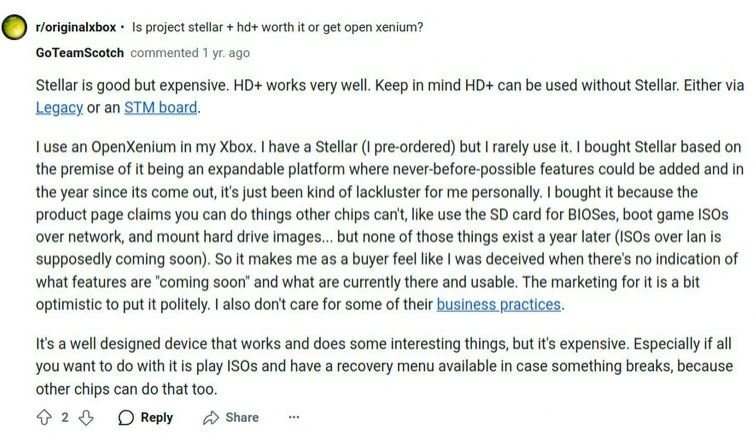
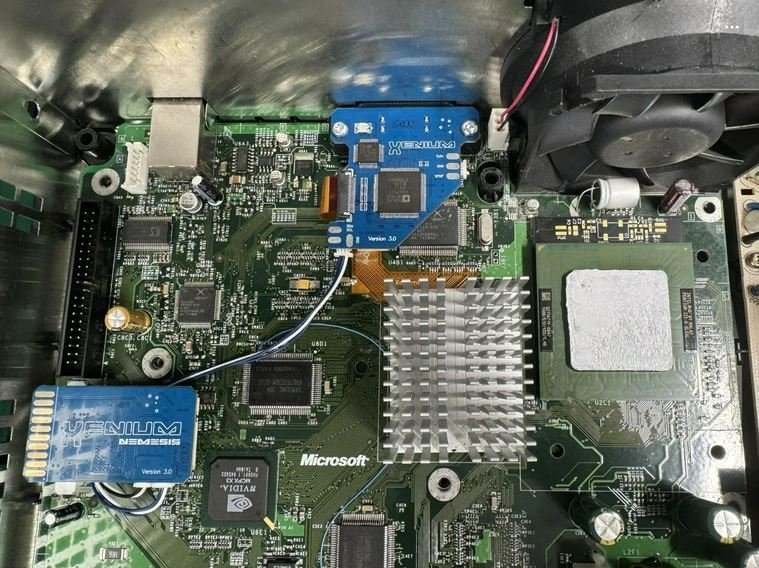
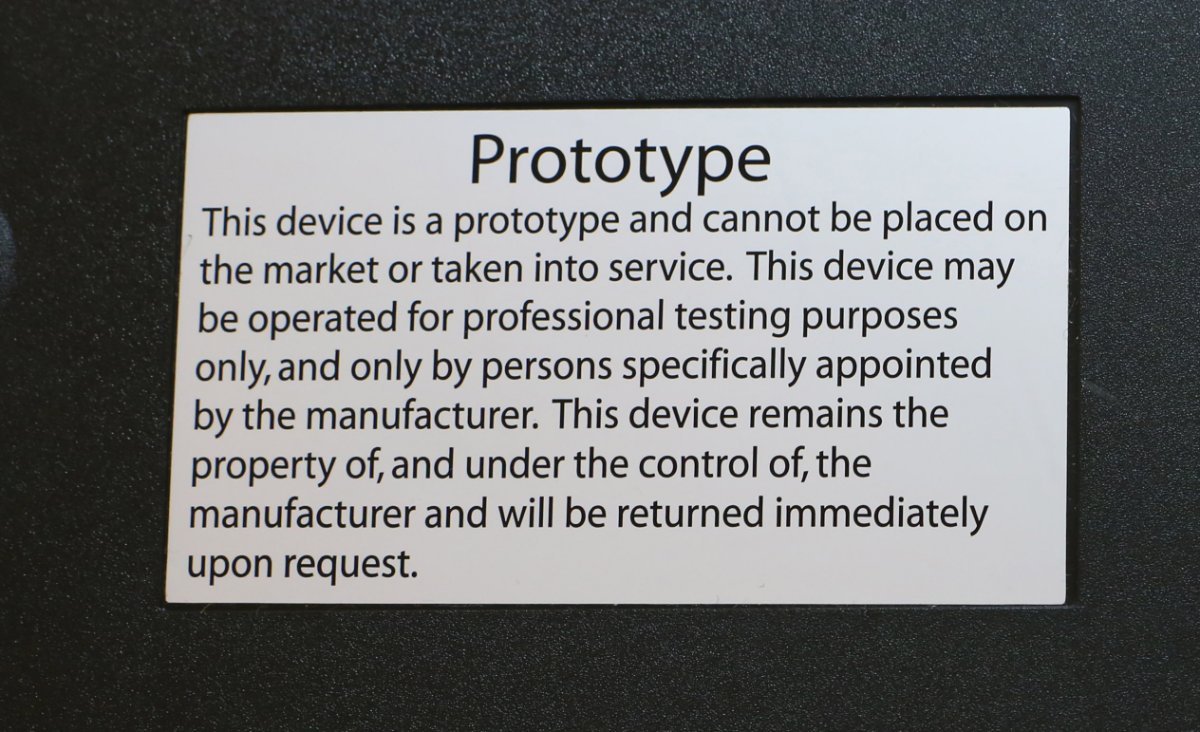
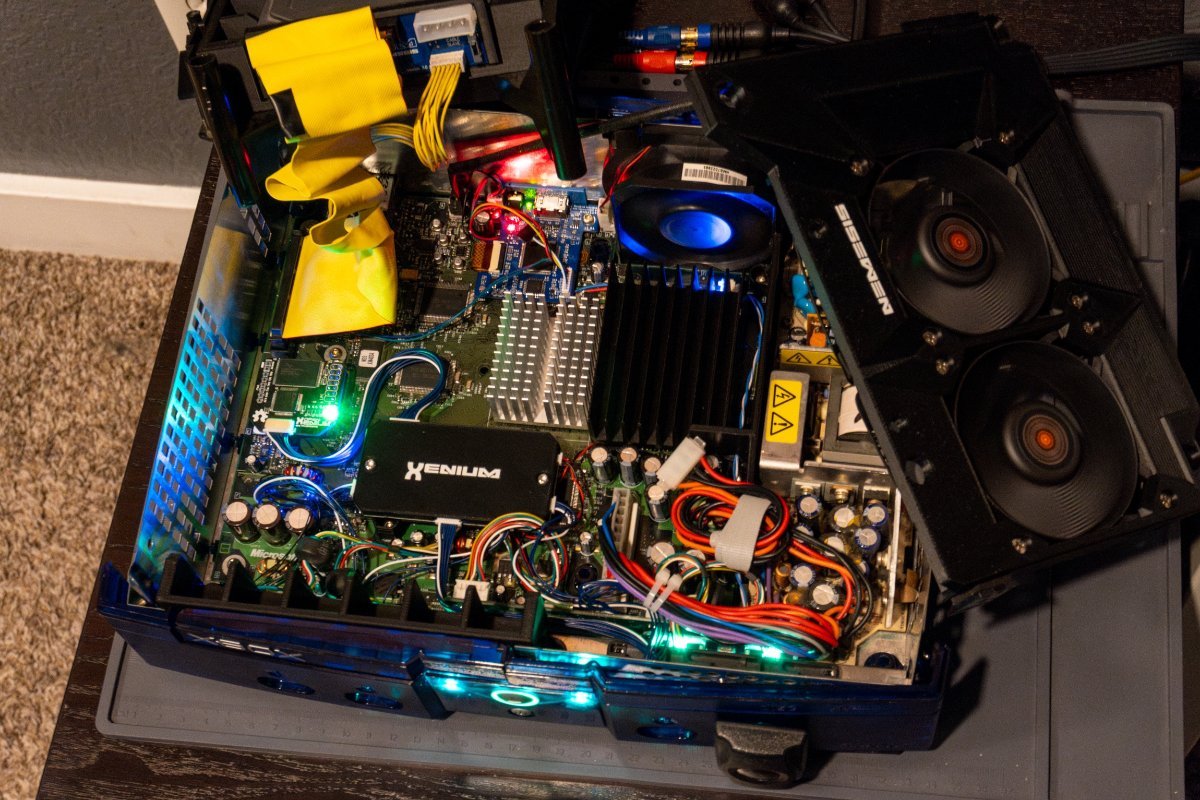
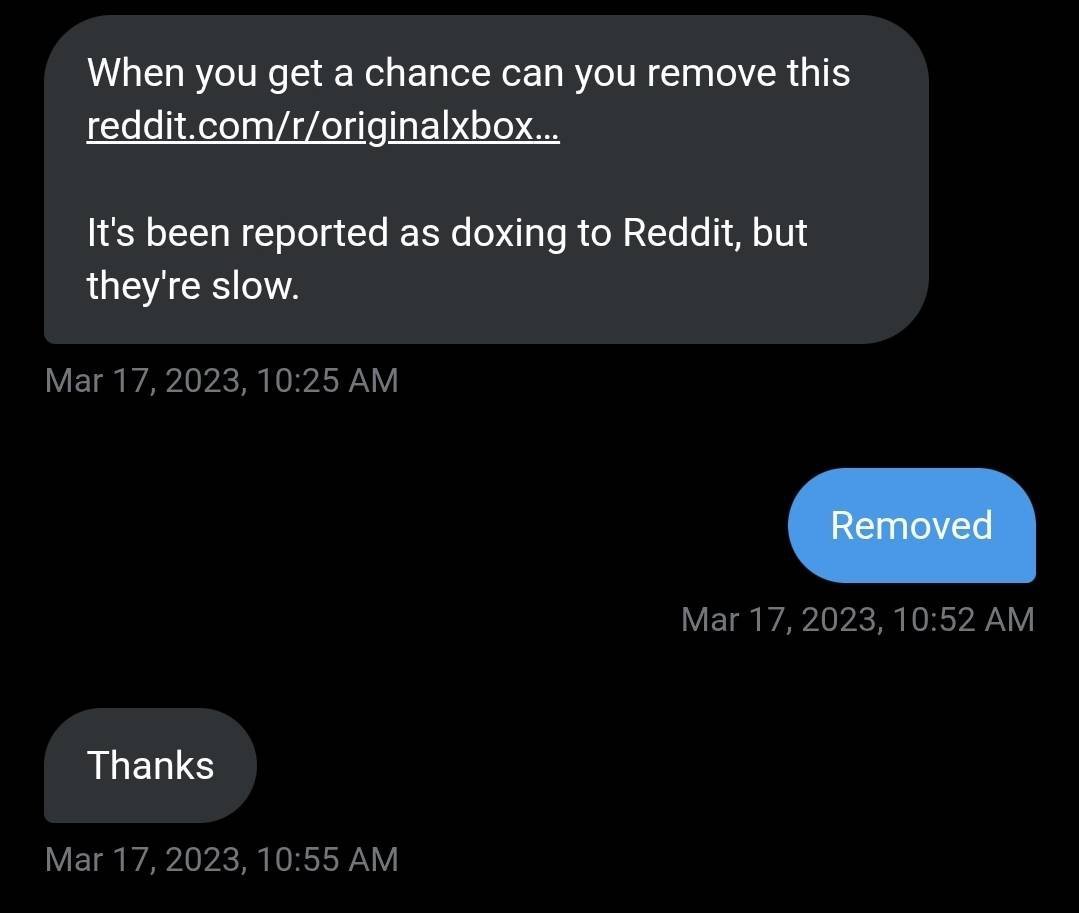
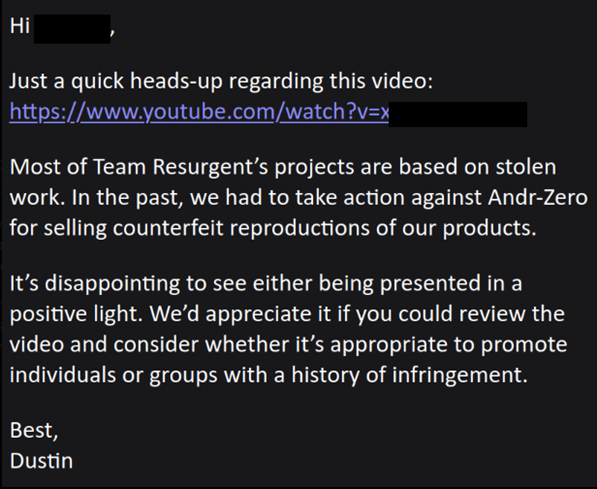
Statement By Harcroft Hi, I am Harcroft. To be absolutely clear, I am not Cerbios, I am not Nemesis, I am not Foxbat, and I am not a member of Team Resurgent and am not affiliated with the development of any of their projects. >Stop promoting the idea that an open-source HDMI mod like OXHD is going to exist. XboxHD+ is a software project made possible through years of development and still continues to this day. Claiming OXHD will be open source is dishonest when it depends on CERBIOS to function and is being developed alongside the same people who have cloned our work before. Public reverse engineering of XboxHD+ continues to guide its development. 1 2 3 4 I'll start with something I wrote to LoveMhz/MakeMhz on May 5, 2024, in the #off-topic channel on the Insignia Discord after previous false claims they made about the OpenXHD project. -------- @LoveMHz I am truly disappointed I had to write this message. I started a project based entirely off Ryzee's HDMI concept board, his Eagle projects and his libraries, to help stop the massive drama between yourself and other members of the xbox community in december. I have stamped out any attacks against you in my vicinity for the last four months. Instead of just enjoying the lessened drama you chose to attack myself and my friends on your public discord and on twitter. With that kindly please stop spreading lies about myself and any projects I am working on, on your discord or any other discords you are doing so on. OXHD will use an STM32G030 MCU at when released which will be incapable of running your firmware unless you specifically go out of your way to build your firmware for the specific microcontroller I will be using, and the specific pinout I will be using. If you have in good faith questions about OXHD I will openly answer them just as I have answered Ryzee's questions truthfully. If you think I am lying, you can ask Ryzee, I have given him everything I have worked on every step of the way. -------- OpenXHD already exists. The firmware is already open source and available here: https://github.com/OGXHarcroft/Open-X-HD-Board/ This firmware is entirely the work of Ryzee119, with minor edits to change pin assignments on the STM32G030 microcontroller. The original repo, this firmware and the original hardware schematic were designed by Ryzee119 and can be found here: https://github.com/Ryzee119/XboxHDMI-Ryzee119 I can not control what other people post. I can respond to them to provide helpful information or corrections if they happen to post incorrect information. In the first image, MakeMhz includes to somehow prove their point, they conveniently cropped out my response to a user showing them the current state of the OpenXHD board. That post can be seen here: https://www.reddit.com/r/originalxbox/comments/1ledwkq/comment/myfgozf/ OpenXHD absolutely benefits from a BIOS that forces 480i video to display as 480p with the current firmware developed by Ryzee119. OpenXHD also benefits from the Force480p video patch provided by NKpatcher. There are versions of Cerbios, EvoX M8+, and other BIOSES with a Force 480p feature. OpenXHD does not require any specific BIOS and does function on consoles running a stock BIOS. The entire source code can be found here: https://github.com/OGXHarcroft/Open-X-HD-Board/ . I have asked testers with functional OpenXHD boards to record and share videos of gameplay run on consoles using a stock Xbox BIOS. Some testers have already begun to stream and record videos of gameplay with OpenXHD on an otherwise stock console. https://www.twitch.tv/rez1988 None of the 4 images MakeMhz included show in any way that OpenXHD does not or will not exist. >End the repeated attempts to clone the XboxHD+. Please refer to my first statement. I am not Nemesis, I am not Foxbat. I have no affiliation with either of their projects. The third picture MakeMhz included is from this tweet I made, which can be found here: https://x.com/OGX_Harcroft/status/1768832597633781792 This was the prototype P03. Several of this prototype were produced, including one by Ryzee119, the creator of the original project. https://www.youtube.com/watch?v=q-WNys2L1Zg&t=3188s At 55:24 in this video, Ryzee119 comments that he produced a board (this was the P03), it works and it was flashed with his old firmware. June 21, 2024 during the recording of a "The Usual Places Modcast" recording I streamed gameplay from an OpenXHD P03 board for 3 hours, 54 minutes, and 53 seconds. This video is can be viewed here: https://youtu.be/SMMoXBWwSFI . Any audio sync issues are due to OBS. The next day, June 22, 2024, I brought that same P03 board in the same console as a demo unit to a public event. That demo console can be seen here: https://x.com/OGX_Harcroft/status/1804542528189849909 . These are two OpenXHD P03 boards hand-soldered by two separate testers: I have made several revisions since the P03 videos in June 2024, and currently v1.04 and RC1 (release candidate 1) boards are in multiple consoles belonging to OpenXHD testers. Upgrades to Ryzee119's original firmware is ongoing. All research is being done with bare metal stock Original Xbox hardware, and with public video encoder datasheets. This can be seen in the Xbox-Scene discord's open-xhd-public-dev channel. I have been transparent with OpenXHD development to the point of showing some friends of MakeMhz the research and development I have been undertaking to design the hardware, none of which includes any XboxHD+ hardware or firmware. None of the other names MakeMhz has made accusations about in this article have made any code contributions to OpenXHD. Some of the users MakeMhz has made accusations about in their hit-piece article have passed along ideas to me to implement into the board design. Every single one of those design ideas further differentiates OpenXHD from XboxHD+. One user MakeMhz has made accusations about has contributed a pair of independently designed 3D models to mount an OpenXHD board into an Xbox. I am the sole PCB designer for the project and none of my work has been based on XboxHD+, it's clones or any other products designed by MakeMhz. >Stop making up claims that Stellar is anti-community, including false accusations like “Stellar intentionally broke support for XCAT.” The truth is that XCAT’s own DRM prevents it from working. Nothing was done on our end to block it. The developers of the Xbox application and maintainers of the XCAT project have never claimed "Stellar intentionally broke support for XCAT." In fact, when users have made this claim, we have corrected them. Stellar update 1.5.0, as well as newer updates, do prevent XCAT from running, just as it prevented Halo 2 HD from running. MakeMhz had to modify Halo 2 HD to function on Stellar. https://github.com/MakeMHz/stellar-halo-2-hd . Whenever anyone has approached MakeMhz about making XCAT function on Stellar on firmware newer than 1.5.0, that user has received either hostile responses from MakeMhz or Redherring32, or feigned ignorance from MakeMhz. As for being anti-community, the fact that I have to waste my time to write a response to the slander in a hit-piece blog post filled with obvious lies and, at the very best, gross misrepresentation of facts shows how anti-community MakeMhz is as both a person and company. I am also not "discountednails" on Reddit. None of the people named in the blog post are this person. I don't understand what MakeMhz is trying to achieve with the screenshots of random reddit posts. >I’m calling out Cerbios / Team Resurgent. This includes all of its members: EqUiNoX, HoRnEyDvL, Hazeno, Dempsey_86, and Harcroft. I, Harcroft, am not a member of Team Resurgent, nor have I ever been a member of Team Resurgent. The image MakeMhz includes in this point was taken from this repo: https://github.com/Team-Resurgent/CerbiosTool . HoRnEyDvL/Haguero made a mistake when creating the Github readme for this tool. I did some testing for CerbiosTool on May 18, 2023. I made a smartass comment about not being credited as a tester. Instead of crediting me as an independent tester, HoRnEyDvL credited me as a team member tester. When this mistake was discovered, it was corrected. Instead of simply asking for clarification, MakeMhz has repeatedly made this incorrect claim. >Later that same day, Harcroft, a member of the Xbox Data Preservation Discord, Team Resurgent, and other related projects, publicly replied to our announcement, stating: We've been doing this for the better part of a year with free software tools and $2 USB/TTL boards. MakeMhz' implication in their tweet was very clear. Stellar is the first and only way to unlock orphaned hard drives (hard drives that are locked with an unknown HDDkey or User Password). This implication is very much in line with all of MakeMhz' marketing. Everything MakeMhz creates is new, has never been done before in the history of Xbox homebrew, and every piece of homebrew outside of MakeMhz' creations is stolen from MakeMhz or Microsoft. I publicly congratulated MakeMhz about their addition of VSC unlocks for orphaned hard drives. I also recommend it as an option for Stellar modchip owners. I have made every effort to be civil to MakeMhz despite the repeated malicious and deceitful comments. The truth of the matter is MakeMhz did not develop the hard drive unlocking code they implemented in Stellar. The Vendor Commands themselves are owned by Western Digital and Seagate. All of the vendor commands and some of the timings have been documented previously in various forms, including: - on Llamma.com: https://web.archive.org/web/20060208043709/http://www.llamma.com:80/xbox/Unlocking%20Seagate%20Xbox%20Hard%20Drive.htm - in the source code for HDD Super Clone: https://github.com/thesourcerer8/hddsuperclone - in WDMarvel Demo: https://arch7rt.com/en/demo/ - on various old forums: https://www.os2museum.com/wp/seagate-serial-talk/ - on various old private blogs: https://jessiesbloggerific.blogspot.com/2011/10/unlocking-my-st310014ace-completed.html We used these sources and others in our initial research to unlock stock Original Xbox hard drives using Vendor Specific Commands. Mid July 2023; Siktah even assembled a first draft PDF to teach users how to recover the User Password for WD drives using HDD Super Tool. Eaton, maker of FatXplorer, after requests from our team of Xbox preservation enthusiasts, added User Password locking and unlocking to assist us with our work. While more complicated at the time, our unlock methods were shared freely with all interested parties. We helped dozens of people unlock and archive hundreds of hard drives, all before XCAT, before Pinecone, before Stellar and PrometheOS Modchips supported VSC unlocks. https://x.com/OGX_Harcroft/status/1707716036097966379 Skye and I publicly discussed this as far back as August 2023 on the Consolemods.org discord server. Before and after this conversation, Skye, Siktah, Eaton, Halo [AUS] myself and several others worked together to gather as many orphaned hard drives as possible. We worked to find non-destructive unlock methods and set out to archive the content on these hard drives. This is where the Xbox Data Preservation discord server came from. By the time MakeMhz had released his Stellar update with the Vendor Specific Command unlock code we had unlocked and archived hundreds of orphaned hard drives. MakeMhz had never once in fact mentioned data preservation publicly until days after I announced starting work on the OpenXHD project. MakeMhz has also never mentioned preservation since the marketing tweets shown here: https://x.com/LoveMHz/status/1740842570232820076 This is one more case of MakeMhz being deceitful in their marketing. MakeMhz has never shared any hard drive dumps, content from their stack of hard drives, or undertaken any other preservation efforts in the Xbox community. In fact, MakeMhz previously known as modular511 on assemblergames has taken money for the sale of development builds of games, then never shipped out the hardware or software, all in the name of preservation. MakeMhz only association with preservation in the context of Original Xbox is to use the word as a marketing tool to sell their products. https://assemblergames.org/viewtopic.php?t=5091 https://web.archive.org/web/20191113112839/https://assemblergames.com/threads/gta-san-andreas-debug-beta-version-xbox.44194/ >If this had already been done before, why does no one now seem to understand how Stellar works? >If you’re not reverse engineering Project Stellar, how would you know that the unlocking logic was moved to a separate XBE? MakeMhz shares expertly cropped images, selectively omitting critical information about the Vendor Specific Commands talk on the Xbox Data Preservation Discord. In the screenshot MakeMhz provided, I suggested a user (founchki) who does not know what a logic analyzer is (as shown in the MakeMhz provided screenshots) use a logic analyzer to tap a bus he doesn't understand. I essentially suggested founchki go on an impossible fetch quest. Months ago I personally removed founchki from that server because of the constant suggestions we undertake impossible tasks that he did not understand. MakeMhz cropped out the next two messages showing me specifically saying I will not reverse engineer any of their hardware. They also cropped out my message about how I was experiencing the same difficulty with OpenXHD design that they did while designing XboxHD+, that the easy route would be to copy their work, but I refuse to do so. Finally, MakeMhz cropped out founchki admitting he does not have the skill or understanding to undertake reverse engineering work with a logic analyzer. I should not have to say this, but I am also not founchki. I have no idea what founchki knows about Stellar or how they know what they know about Stellar. MakeMhz failed to share us discussing capturing Vendor Specific Commands from source code from the above-listed PC-run applications and guides without the need for Logic Analyzers or any of MakeMhz's hardware. Skye is the expert on this subject, so I will leave any explanation of how she uncovered or sourced any additional VSCs in her capable hands. MakeMhz has no real evidence to support their claims regarding myself or the OpenXHD project. Many of their included images have nothing to do with the accusations they are making. Almost all of their screenshots are conversations from 3rd parties not associated with myself, Team Resurgent, or any other party MakeMhz made false accusations about in their deceitful hit piece article. MakeMhz is making false claims, including fraudulent DMCA complaints they know to be untrue, in order to discredit projects they have no affiliation with. MakeMhz posted the malicious and slanderous article in a way that it can't be directly interacted with or responded to by the parties they falsely accuse. This is the very definition of anti-community. The new blog post hit-piece is just another event in the long line of manipulative, abusive, and deceitful behaviour MakeMhz has perpetrated against the community the entire time I've known them. Since Decemeber 5th, 2023, when I started the work that would eventually be known as OpenXHD, I have gone to extraordinary lengths to keep the peace between MakeMhz and the community full of individuals understandably outraged by their behavior. I have shown ample patience with the repeated public accusations MakeMhz has made about myself and my work, accusations they know to be false. My patience is expended. MakeMhz portrays the situation as if they are under attack by an entire community at all times. In reality, MakeMhz attacks projects and people in the community, then plays the victim when their malicious and deceitful attacks elicit any response from the same community. I would once again just ask that MakeMhz stop lying, stop slandering, stop libeling myself and the OpenXHD project, but I have seen that gestures of good faith on my part end with more lies, more malicious attacks, and more underhanded bullshit from them. I, Harcroft (not Cerbios, not Nemesis, or FoxBat, not a member of Team Resurgent) will continue to work on OpenXHD until the hardware portion of the project is complete. I will continue with the preservation work I started almost 20 years ago. MakeMhz can lie, MakeMhz can slander, MakeMhz can issue false DMCA claims until there are no websites left on the internet to harass. What MakeMhz will never do is extinguish our love of the community, our love of hardware hacking, our love of the Original Xbox. -Harcroft
-
GoTeamScotch Response I'm Scotch ("GoTeamScotch"), a moderator of the subreddit [r/originalxbox] and the [Xbox-Scene Discord]. I also occasionally publish articles on [Xbox-Scene.info] and host the Xbox-focused podcast [The Usual Places]. I apologize in advance for the hefty read ahead. This topic is a bit of a can of worms that has been going on for many years. To outsiders, it can seem rather silly that there's "drama" in modding a 20 year old game console. Most people don't want to get into the lore, and I don't blame them. I was in the same camp myself for about 2 years, then started experiencing it personally. Myself and others have intentionally avoided being too vocal with our personal opinions on MakeMHz's behavior specifically to avoid stirring up drama. We all just want to have fun and tinker with these things, but we've been ignoring the elephant in the room long enough and it's time to give the topic a proper deep dive. In LoveMHz's article, [Theft in the Xbox Scene - Part 1], he accuses the moderation team of r/originalxbox of allowing harassment, misinformation campaigns, and the promotion of stolen work. He also references a few of my comments specifically. This is my personal response and opinions towards these allegations. These are my own personal opinions. I am not a lawyer and none of this is legal advice. Allowing Harassment First and foremost, I'm not surprised that he feels "harassed" by some of the negativity expressed in different parts of the Xbox-modding world. He moderates his own community (the MakeMHz Discord server) with the heavy-handed approach of banning users at a moment's notice (ask me how I know) if they dissent too sternly from the idea that Stellar is anything but the greatest thing since sliced bread. He has insulated himself so thoroughly from criticism that when he steps outside of a space that he controls, it can feel like he's being attacked by "haters" who are just out to get him. The reality is, MakeMHz has a long history of [questionable business practices], some of which have lead to negative feedback from customers and bystanders in the Xbox modding community. There are more skeletons in the closet from his past beyond this list, most of which I don't care to dig up. I believe in second chances, and I believe people can change for the better and learn from their mistakes. That said, I think there is a pattern of behavior that is troubling that should be discussed for the sake of the health and vitality of the Xbox modding scene at large. It would be a shame for newcomers pulling their Xboxes out of the closet and be discouraged from experiencing some of the things the modding community has to offer out of the notion that they may be supporting "theft" in doing so. Generally, the Xbox modding community, or at least the parts of it that frequent r/originalxbox and Xbox-Scene with their combined 100k+ users, is one that thrives through the spirit of collaboration and accessibility through making the modding process as cheap and easy for the average user as possible. [Modxo], [Skeleton Key], and [OXHD] are great examples of this. This often means projects are shared freely, often with source code available, so that they can be expanded upon and contributed back to. MakeMHz's products (Project Stellar and HD+) are closed-source, proprietary, relatively expensive, and don't make much effort to be cross-compatible with existing hardware (i.e. LCD screens). Stellar is also the first modchip ever for the Original Xbox to not support flashing arbitrary BIOSes to it, despite it being listed on the product page. [Stellar SD Card Slot] [Stellar SD Card Slot 2 - FAQ] With all this in mind, it should be no surprise that starting a business in this landscape would be met with some level of skepticism over motive, and even friction from some segments of the community. The moderation team, including myself, strive to keep the peace while allowing people to express themselves and their opinions, especially when it comes to people sharing their experience with sellers of hardware. We let people discuss what they want so long as they respect the rules of the platform and the server/subreddit they're hosted in. We have, and routinely do, remove posts and comments that do not meet these standards as described with specific examples in another section of this response. Public MakeMHz/Stellar conversations tend to be a tinder box, where people have strong opinions... often shared using colorful and charged language. These threads are where we receive a disproportionately high amount of reports from. These reports are handled as they come in, but our goal is not to silence people or control the narrative. It is not "our" community to control in that way. Stellar/MakeMHz related threads also are ripe for alleged vote manipulation. It is exceedingly common for comments/posts critical of Stellar/MakeMHz to be downvoted and reach -10 (or lower points) immediately. It is as consistent as it is suspicious. There's also the matter of claimed harassment via doxing, which is a tricky topic. LoveMHz is somewhat of a public figure in that he has associated his real name and photo with his online identity. He has a legally-registered LLC in Georgia (USA), and because of his status as a seller, is subject more scrutiny than your typical random thread starter. We, of course, do not support or allow people sharing his personal home address, phone number, names of relatives, or anything of that nature. But there is a difference in what is tolerable to be shared and talked about compared to your average online poster. This was a point of contention in the thread [Can we talk about LoveMhz/MakeMhz (Project Stellar/XboxHDMI)’s criminal background]. In this thread, a court case discussing LoveMHz's past was shared. LoveMHz reached out to me and asked for it to be removed "due to linking of personal information (Reddit ToS) and harassment (Reddit ToS)". The mod team and I talked about it internally at length and we concluded that the court case was relevant for potential buyers to be aware of because it dealt with hacking and fraud over computer networks, and people were using his software (StellarOS) on internet-connected devices (Xboxes) in their homes. This is a level of trust some people may not be aware they are giving. There were instances of people sharing too much information, and we pruned those comments. Here's the response I gave to LoveMHz about this in 2023: > The mod team discussed/debated the post yesterday and the decision we've reached is to leave the post in place. There's two potential issues at hand: harassment and the sharing of personal/private information. The post is inviting discussion about the trustworthiness of MakeMHZ as an online seller, whether that be positive or negative. This by itself is not inflammatory, and the closest OP comes to making inflammatory remarks is calling your history "sketchy". The post also references a court case. The case is publicly viewable online, so it was not deemed to be private information, but it is arguably personal information. The case OP referenced is one that deals with a tech-related crime, apparently involving hacking. The reason why this is relevant is because the buyer/user is running code on their console, created by you, that is not open-source or able to be publicly reviewed. So, there is a level of trust required by the user while using your hardware/software in their homes, especially when it is running on a device that is typically connected to the internet. So, since the content of OP's post does not break our rules or that of Reddit's, we are going to leave it in place. Reddit's content policy is somewhat vague when it comes to sharing information such as this. The post references a specific court case, and that case does contain your real name, which could be argued as being doxxing, but you are also somewhat of a public figure, in that you have publicly tied yourself, including your real name, to MakeMHZ on Twitter. If your address or other private contact info is shared, we will of course moderate those comments as usual. Other than that, people may have negative things to say about their experiences with MakeMHZ, and so long as the discussion is reasonably civil, stays on topic, and doesn't break our sub's rules (or Reddit's), we don't see a need to remove those comments, even if their language is a bit heated. Multiple people have apparently had bad experiences when buying from you. That doesn't mean you're intentionally scamming people, but if there's reliability or order fulfillment issues, we believe it's fair to allow people to inform each other of their experiences. Source: Twitter/X DM, Mar 18, 2023, 11:14 AM What qualifies as harassment vs someone who is upset expressing themselves is often a judgement call. Of course, if one person is following around another and consistently targeting them, that's textbook harassment. But as a seller and a public figure, people having opinions about your products and being vocal when they've felt let down is part of the territory to some degree. You can't please everyone all the time. All you can do is try your best, be timely, keep up communication/transparency, and in the end, kill them with kindness, which is basically what I said to him: [Twitter/X DM screenshot Mar 18 2023 11:19am Pacific] In summary, we (the mod team of both r/originalxbox and the Xbox-Scene Discord) do not allow doxing or blatant harassment of individuals, but we do allow the open discussion of sellers and makers in the community, even if they are critical of said sellers. Misinformation Campaigns LoveMHz also said we allow "misinformation campaigns". I'm not even sure how to respond to that. In general, there are relatively few Stellar related threads (or even comments) that pop up in the subreddit. Our 92k members post about a variety of topics, and Stellar/MakeMHz isn't a very common one. When it is talked about, there tends to be people with criticisms in the comments. I, do not have the impression that there is an ongoing coordinated effort or conspiracy to spread false information about Stellar. You simply have upset enough people, for whatever reason, for it to be common enough that when Stellar does come up, there's probably someone around to voice their criticisms. And again, so long as that person is not breaking the rules, our general stance is the allow the discussion. This same thing happens with other products and sellers (Pound HDMI, EON XBHD, Kaico Xbox HDMI adapter, etc). Promoting Stolen Work This accusation breaks into two categories: 1. Clones / unauthorized use of MakeMHz's IP - HD+ Clones - Legacy Clones - Use of his parts of his software in other scene projects 2. Use of the Xbox Development Kit (XDK) and Xbox kernel leaks (discussed further down in the "Everything Else is Illegal or Obsolete" section) - Custom BIOSes, including Cerbios (a competitor to StellarOS) - Homebrew apps built with the leaked XDK environment software Item 1, in general, I can understand. MakeMHz is running a business and wants to protect his work and his IP. I can sympathize with his desire to control his works. I myself work for a software company, and if our source code got out, that would be bad for me. Where I lose sympathy is the means by which he controls his works. He is a person who is quick to submit DMCA takedown requests, in a formal legally-binding setting, where an informal conversation may be a more civil and, in my opinion, a much more reasonable way of protecting one's IP. Take the infamous moment of filing a DMCA takedown against ConsoleMods.org in Dec 2023. ConsoleMods.org is a wiki where users can submit pages with information and guides on how to perform various tasks related to the Original Xbox, among many many other retro consoles and devices. A user submitted a guide for how to setup and use an off-the-shelf $2 STM32 development board to make HD+ work with non-Stellar systems, without buying MakeMHz's $20 "Legacy" board, which has the same purpose. Backstory: MakeMHz originally designed HD+ with an STM32 chip on board, and "due to supply chain shortages" (which was a genuine problem that happened). This has generally been viewed by people as a "cash-grab" to force people to using Stellar, which MakeMHz has denied. This chip (STM32) was later removed from HD+, and work was offloaded to the Stellar modchip. HD+ used to be a standalone product, and now it only works with Stellar (or Tepache-powered devices). Again, I don't fault him for wanting to protect his work. It's his firmware, that's fine if he wants to control it. But going to the immediate step of filing a DMCA notice was an unreasonable first step to take, in my opinion. Especially considering the content of what the page held was incredibly thin. The page essentially had a 4-step process listed out with vague instructions. It was a very short guide. This page did not link to MakeMHz's firmware, and ConsoleMods did not host the firmware either. Here is the content of that page (which has since been removed): [Tepache guide on ConsoleMods.org] When I asked LoveMHz about his decision, this is what he had to say: [LoveMHz reply to CM DMCA takedown] It would be trivial to track down and talk to the people who run ConsoleMods, so hiding behind the idea that "due to the domain's privacy settings" that he had to contact their host instead is disingenuous, especially since he has spoken with the owners of the site directly in the past and the contact info is readily available in the links at the bottom of any page on the site. My stance back then is the same as it is now. It's excessive for this to be your first action. Especially over something so trivial. [Scotch response to LoveMHz - CM DMCA takedown] LoveMHz cites two specific instances where I "promoted the theft of his work": 1) [Reddit Link] My comment was in response to this question: "I see a stellar bundle and a legacy one but both include some modchip which I don’t want to replace my x3 with. Anyone install a hd+ with a different mod chip then a stellar or the one included with the legacy?" I'm stating that STM32 alternatives exist as a response to someone who is specifically asking about avoiding using a Stellar / Legacy with an HD+. I'm not going out of my way to promote and highlight it. The person specifically asked, and I told them that it exists. I didn't provide a link to a store, a guide, or a link to firmware. 2) [Reddit screenshot 2] [Reddit Link] Again, the OP asked about HD+ and asked about using an OpenXenium modchip with it. I stated that it's possible to use an STM board and linked to a photo showing what that looks like. I also linked to MakeMHz's store where people can buy it directly from him. I wasn't advocating that people avoid buying the official board. Aside from Tepache / STM32 boards, there do exist clones of MakeMHz's HD+ video output product that rely on MakeMHz's proprietary firmware. Specifically, this is referencing the clone made by Nemesis called "XeniumHD". The clone obviously pulls direct inspiration from MakeMHz's design, while being its own unique creation. [XeniumHD installed into an Xbox] Image credit: aceconsolerepairs.com.au [MakeMHz's HD+] Image credit: 8bitmods.com Just to be clear, gerbers were not stolen and firmware is not supplied by producers. It is its own unique work, but it's still a clone in the end. I can't imagine Nemesis' work impacts the sales of HD+ to a considerable degree, but it is still a problem for his business goals, and I understand that. Nemesis is his own person, and isn't a part of the mod team, nor is he a moderator or representative of r/originalxbox or the Xbox-Scene Discord. We do not have control over what he does or creates. Nemesis has also been away from the community for several months due to personal reasons, so it's not an active project that is being maintained or produced by him. Discussion regarding HD+ and STM32 clones will continue to be allowed in relation to troubleshooting and usage. We will also continue to not allow the sharing of links to firmware or binaries. This has been, and will continue to be the case moving forward. Vendors who offer installations of an HD+ clone will be removed and direct links or references to installers will not be allowed, as has always been the case. We will not, however, remove discussion of their existence. These things exist, they're out there, some people use them, despite their dubious nature. If someone has installed their clone and needs help using it, we won't avoid helping them. But we will continue disallowing sharing of links to copyrighted firmware files. Everything Else is Illegal or Obsolete MakeMHz has the vocal stance that all other options are the result of theft, made using stolen software, and are illegal, if not obsolete ("legacy"). [MakeMHz work of theft comment] [Source] It's admirable to want to provide a clean and legal solution. However, where he oversteps is his efforts to cast doubt on every other project that came before his. Without "dirty scene releases", the Xbox would not be where it is today. And we wouldn't have Kodi or Plex, which both began as forks of XBMC (Xbox Media Center). Perhaps he genuinely does care about being clean and legal, which I assume is very important perception to maintain considering his criminal record, but at the end of the day I seriously wonder if he would be so adamant about us all respecting Microsoft's copyright if he wasn't personally profiting from a $100 modchip that needs to be legal. He operates as a legally-registered LLC. This is his primary income source. And thanks to his recent blog article, we know he's close to fulfilling his 10,000th order shipped (not including retail partners), which must be a serious amount of money over time. In the end, you're still selling a modchip. You're still making a device that circumvents technological protection measures (TPMs) used by copyright owners to control access to their works (protected by section 1201 of the DMCA). And it should. If it didn't, people wouldn't buy it! People install modchips to bypass these security mechanisms to play unsigned code (homebrew apps) and launch game backups, which the stock Xbox kernel specifically prevents. He knows people have this expectation, hence why he said Stellar will have "all the features you would expect from an Xbox mod". A mod that didn't disable security protections in this way would be a pretty useless mod, all things considered. I know he'll never say this is such short terms, but that is the reality of the situation. Your device still requires the Xbox BIOS/kernel to work in the first place. Since I have a v1.0 Xbox that didn't ship with the required firmware (5838), I couldn't dump it from my console, which means I had to go acquire it from dubious sources. His comment about theft relates to two points: 1) Xbox Development Kit: Microsoft's toolkit for making Xbox programs. 2) Xbox BIOS/Kernel Code: Microsoft's operating system for Xbox (based on a modified Windows NT kernel). I want to make the distinction that these pieces of software were not "stolen" by hackers. People didn't break into Microsoft's servers or steal someone's credentials. They were given to modding groups many years ago by official developers and even Xbox employees (allegedly) with the idea that hobbyists would make cool software with them. This was never sanctioned officially, but Microsoft also never lifted a finger to stop it either. And we are now 19 years past the last Xbox game being published and 15 years since Xbox Live was turned off. We are now wholly in the era where the only people who care so fervently about the legality of homebrew developers using the XDK and BIOS source are the ones who need the "everything else is illegal" narrative to stick for marketing purposes. But don't take my word for it. To quote a couple former Microsoft/Xbox employees we've personally talked to about hobbyists using leaked copies of the XDK and/or kernel source code: (Quotes used with permission) We exist in a grey area where we don't have licenses to use these pieces of software, and definitely can't use it in a commercial context. But to call it "the work of theft" is a bit misleading. Again, he (and his cohorts) are the only people to adhere so fervently to this mantra, and in my opinion is primarily done to discredit his competition as being viable options to the public. Even still, software created using the XDK is still wholly the work of the person who created it, and the build-environment does not negate that software's ability to be open source. Also, if I can be pedantic for a moment, LoveMHz owns/has owned multiple development and debug kits, which are to this day property of Microsoft. They were given/sold to people, and they eventually found their way into the hands of collectors and modders, including LoveMHz. That's what the blue "MS Equipment" sticker means. There's a label on the bottom stating as much. Not to mention LoveMHz's use of Dolphin, a sample program included with the XDK, as part of his testing. Granted, he could have reverse engineered Dolphin in a clean room (?)... after acquiring a binary that he was never supposed to possess in the first place. We're all a bit guilty of breaking the rules then, aren't we? My Experience as a Customer As I've hinted to above, I used to be a supporter of his. [Scotch Stellar announcement Tweet] I praised his efforts, gave him compliments, and defended him when others were critical. [Scotch Stellar Support Example 1] [Scotch Stellar Support Example 2] I pre-ordered a Stellar and HD+ in October 2022 because I was genuinely excited as an Xbox fan and enthusiast. [Scotch Stellar Order Receipt] He was doing stuff that was exciting and new. I thought the "drama" between him and the wider Xbox scene was dumb and I didn't understand it until I started experiencing it personally. I believed the hype and bought the product only to find it was half-baked, with several features missing... features that made me want to buy it in the first place. And it was only after I installed Stellar and HD+ that I realized that I couldn't load a different BIOS or swap in a different modchip, since HD+ does not work without Stellar. His misrepresentation of Stellar's current features are so common, it's become a meme even in his own circle. [Say the line] I gave it the benefit of the doubt and let the project mature, which did happen to some extent (Net ISO loading, native Xbox One gamepad support). My primary point of contention is, and always has been his marketing tactics. Since the 1st announcement post, it has been touted as a revolutionary device for Xbox. Or more specifically, "The world's most powerful add-on for the Original Xbox". When you actually dig into the features Stellar supports, it's not too far off from freely available alternatives. I think most buyers see a fancy modchip and a list of impressive features but don't understand what they mean or if they're exclusive to Stellar. I dig into the list and go line by line comparing each to other options in [this comment here]. Stellar does some cool things, but when asked, my recommendation to people is that you can achieve most of the same results using devices that are 1/10th the cost of Stellar. This is not me being a "hater", this is me giving recommendations based on my own opinions and experience, just as I would do with any seller. I gave him the benefit of the doubt for a very long time. But when I repeatedly asked him to be more transparent in the product's listing page, after having to explain to newcomers "no Stellar doesn't actually do that even though it says it does", I can't help but conclude that it is deliberate. [Product page complaint 1] [Product page complaint 2] A month later, I brought it up to him again. I was then banned from his server for pressing him to update the product page and disagreeing with him too sternly. I was stern, but not outright rude. I don't have screenshots of the conversation, since he deleted them. Here is a message I sent to a friend minutes after being banned who asked me about it. [Scotch description of ban] This wasn't the first time he's blocked/banned me either. In July 2024, Macho Nacho released a video talking about Prehistoricman's 256MB RAM mod for the Original Xbox. 8 minutes later, LoveMHz then sent out [a Tweet] saying 256MB RAM was coming to Stellar. [MakeMHz 256MB Tweet] I then clarified that MakeMHz didn't create the mod. [Scotch Tweet - 256MB RAM clarification] I reached out to Prehistoricman to ask if he was working with MakeMHz and he said that the first communication he received about it from MakeMHz happened after the announcement. [Prehistoricman confirmation] We later spoke about this event on the podcast episode where I interviewed PHM about his 256MB project here: [The Usual Places Modcast - Episode 4: Prehistoricman & MrMario2011] (starts at 56:10). [Blocked On Twitter] Again, it's just really strange behavior. I saw it as an attempt to imply that this groundbreaking project was related to Stellar, or at the very least try to bring the spotlight back onto himself when someone else beat him to getting something working that he's been struggling with for a long time. I spoke to people and confirmed that they genuinely had the impression from MakeMHz's Tweet that he was working with PHM on the project. I've tried reaching out privately to him to try and come to an understanding, and so far my messages have gone ignored. Conclusion Dustin is a talented programmer and has a deep understanding of the inner workings of the Original Xbox. The hardware and software he produces is, in general, fairly well designed, if not overhyped at times. That said, there are no shortage of members of the community who have either had unsatisfactory experiences as customers with his company, or disagree with the way he's conducted himself over time, myself included. I think it's a shame that someone with his talents chooses to divide such a passionate and niche community in the way that he does. LoveMHz, please: - Stop discrediting work made with the XDK and calling apps built with it "the work of theft" - Stop scaring people away from using aftermarket BIOSes under the notion that doing so is "illegal" - Talk to people before (or instead of) sending DMCA threats - Update Stellar's product page to clearly indicate what features your product actually has versus what features are simply coming soon P.s. About the line: *"Stop promoting the idea that an open-source HDMI mod like OXHD is going to exist"*. I've been using an OXHD in my Xbox for over a month now and it's been working great! Harcroft was even kind enough to implement my suggestion of using a 3.5 TRRS jack (instead of the TRS jack he was using) so that we could get analog component video out, in addition to HDMI (simultaneously), which has been working great.
-
The Reddit Moderation Team Speaks > These moderators continue to allow harassment, misinformation campaigns, and the promotion of stolen work. The /r/OriginalXbox moderators allow both positive and negative discussions about all sorts of original Xbox products and are entitled to their own opinions on products and companies. If we know the answer to a question, we will answer it honestly, and there have been cases where moderators have [recommended] or [helped users troubleshoot MakeMhz products] [second example]. We do not censor opinions unless the posts or comments break the Reddit Terms of Service, subreddit rules, or were reported and reviewed by a moderator to egregiously violate Reddiquette. Otherwise, discussion flows freely, even if it casts your product in a negative light. For example, both the EON XBHD and Kaico Xbox HDMI adapter are both controversial products with many people expressing heated disdain for both the products and the companies. We have not witnessed a "misinformation campaign". After searching "makemhz" and "lovemhz", nearly all 150+ comments and mentions of MakeMHz products were positive recommendations or troubleshooting. No posts were marked as reported (e.g. for harassment) nor are there any Moderator Mails related to MakeMhz that we could find. On the contrary, the subreddit moderators have acted in the benefit of MakeMHz on multiple occasions. In one case, LoveMhz directly reached out to one moderator, Derf_Jagged, to have a doxxing reddit post removed, and it was removed immediately. In another case, another comment that included doxxing was removed, unprompted. One of the major negative posts regarding MakeMhz was [this one] discussing the [public criminal background of Dustin Holden] in regards to trustworthiness in relation to buying MakeMhz products. This was deemed relevant to discussion of the company and customer awareness. This thread was locked as heated opinions were out of control and removing the thread would likely have prompted the participants to create new threads about the same topic. However, the following comments were also removed as they [alleged rape and sexual assault], which is beyond the scope of consumer awareness for the company as a whole.
-
Equinox Clarifying False Claims About the Tepache Repository and STM32 Hardware There’s been an accusation implying that Team Resurgent is enabling firmware theft by publishing guides that show others how to bypass protections. I'd like to respond directly and set the record straight. Original claim: “There are clone devices already on the market. Sellers advertise them and tell buyers they ‘just need to find the firmware’. These are not throwaway comments. Members of Team Resurgent have previously written guides on how to bypass our copyright protections in the past, and those same techniques are now being used to install stolen firmware onto unauthorized hardware.” My Response: 1. The GitHub repository being referenced https://github.com/equinox2k/Tepache is from my personal GitHub account and is not affiliated with Team Resurgent in any official capacity. 2. The content in that repository is a direct backup of a public post that has since been taken offline. I did not write the original material it was mirrored 1:1 purely for reference, not as a tutorial, guide, or official endorsement by myself or anyone else on the team. 3. The “kit” referenced in the repo is not a custom device, nor was it developed or promoted by Team Resurgent. It’s simply a standard STM32 development board a common and widely available piece of hardware connected with a few basic wires. Nothing about it is proprietary or unique, and no special hardware was created or distributed. 4. The diagrams and documentation included in the original post were created by third parties and full credit with original source links was preserved: • https://x.com/Voultar/status/1730402174578921870 • https://x.com/modzvilleusa/status/1730395888659616088 For further context, here’s a public OGXbox thread where Nemesis himself discusses the origins of the kit: https://www.ogxbox.com/forums/index.php?/topic/12202-debunking-makemhz/ In Summary: • The Tepache/SEM content was created by others, not by me and not by Team Resurgent. • The GitHub repo was a passive archive, not a guide or endorsement. • The hardware in question is a generic STM32 dev board, not a clone device or piracy tool. • No copyrighted content, firmware, or bypass instructions were authored or hosted by me or the team. Just like a user must provide 5838 bios for Stellar to function which can be obtained by dumping the same applies here.
-
Team Resurgent For quite some time now, there have been false claims directed at Team Resurgent: accusations of theft, misinformation about our software not being open source, and ongoing attempts to discredit our contributors. So, let’s set the record straight. Our GitHub account contains over 80 public repositories spanning Xbox, PC, and other gaming platforms. All of our code is available for public viewing, cloning, and contribution. The claim that our projects “aren’t open source because they require the Xbox XDK to compile” is not only misleading, it’s fundamentally wrong. Open source is defined by the availability of the source code under an open license, not by the tools required to build it. Many widely recognized open source Xbox projects, such as XBMC, XBPartitioner, and XPort’s emulator ports, also required the XDK to compile and are still considered open source to this day. If the logic behind these accusations were applied consistently, a huge portion of Xbox homebrew history would be disqualified, including many of the projects still preserved on GitHub, SourceForge, and similar platforms such as https://archive.org/download/XBSCDB Whether a project uses the XDK or not has no bearing on its open source status. You are not obligated to use our tools. If you don’t agree with our approach, that’s fine move along. But don’t try to police which tools we use or shame developers who choose to work with the most effective toolchain available for legacy Xbox hardware. Calling us out for using tools that have been part of the Xbox development scene for over 20 years especially when those tools were not stolen from you is disingenuous. You don’t get to rewrite the definition of “open source” or gatekeep access to the scene just because others have taken a different path than you. As for the recent DMCA takedown, yes, one of our repositories included a small portion of GPLv2-licensed code without proper attribution. That was an honest oversight and was promptly fixed once brought to our attention. It could have been resolved quickly through a GitHub issue, a pull request, or even a direct message. Instead, the person involved went straight to filing a formal DMCA complaint, making no effort to resolve it constructively. That alone says a lot about their intent. Unfortunately, this isn’t an isolated incident. The same individual has repeatedly gone out of their way, both publicly and privately, to discourage and discredit contributors in the scene. A recent example involved one of our members who designed a replacement PSU for the original Xbox (PXU). A third-party content creator reviewed the product, and despite it having nothing to do with this person’s work, they still contacted the reviewer directly in an attempt to discredit both the product and the developer behind it. These are personal attacks dressed up as community concern. We’re grateful the reviewer saw through the attempt to shut the video down and chose to keep it online. In just over a month, it has reached more than 218,000 views a clear sign that people care more about progress of the scene and real world results than petty drama. Finally let’s be clear. We are not Cerbios. We are not Xenium Mods or Nemesis. We are not Team Foxbat, Team UIX, ModzvilleUSA, or any other group being dragged into this narrative. Team Resurgent has no involvement in the accusations being made about cloned products or SEM addon. Those projects were created by other individuals or teams entirely. We are not responsible for what someone chooses to host on their private GitHub accounts. The only thing we stand behind is what’s publicly available under the official Team Resurgent GitHub. Anyone is free to approach us and request hosting for a project. Some contributors prefer to stay anonymous. Others just want to use the community reach we’ve built to gain visibility and support. There’s nothing wrong with that. That’s what communities are for. Team Resurgent’s Discord channels on the Xbox Scene server aren’t some closed, invite only dev space. They’re open community hubs where builders, creators, and contributors collaborate to improve the scene and offer support. When we make mistakes, we own them and fix them. We welcome fair criticism, but we’re not going to sit quietly while people take cheap shots at real community work just to stir up drama. We’re here to support the people who care about progress, and we’ll keep building alongside anyone who shares that goal. This will be our only statement on the matter. We won’t be entertaining further drama or distractions. Our time is better spent building, contributing, and supporting the community. That’s where our focus is, and that’s where it’s going to stay.
-
An XBOX-SCENE Statement The Xbox Scene Discord does not host or support the unauthorized distribution of Makemhz "copyrighted content". Any valid take down requests that are submitted are handled promptly, and users who shared content are swiftly dealt with, including removal of files and users when necessary. This is clearly shown below in the 5 years we have been on discord this was our one and only violation email ever received on May 30th 2022. Our focus has been on building a strong, inclusive community where over 12,000 members are free to discuss a wide range of topics from modding and development to general chat and support. We also provide a safe space for creators to share & collaborate. That spirit is reflected in events like Xbox-Scene Modfest, which saw 18 submissions and two standout winners across software and hardware categories showcasing the talent and creativity within our community. This server is clear example of what our community can achieve when it comes together around shared interests and hobbies. These attacks are not isolated incidents. This individual has gone out of their way to try and disrupt not just Xbox-Scene as shown highlighted, but the legacy of an entire community, a community that has existed since the early 2000s, and helped shape what the original Xbox scene has become today. A community that has consisted and continues to consist of incredibly talented hardware and software developers. A community that has brought forth an enormous amount of homebrew games, emulators, and applications that pushed the boundaries of what was possible on the original Xbox. What started as a hobby for many grew into something much bigger. A lot of developers who began here went on to build careers at Microsoft, game studios, and tech companies around the world. The contributions from this scene can be seen across countless tools and projects, many of which are documented in places like https://www.gamebrew.org/wiki/List_of_all_XBOX_homebrew These are the people, the ideas, and the efforts this individual is trying to silence. Why? Because they don’t align with his personal morals or opinions specifically around what development kit was used. The fact that many of these creations were built and continue to be built using the official Xbox Development Kit (XDK) seems to be enough for him to dismiss, discredit, and attack an entire generation of innovation. STOP THE CONSTANT LIES AND ACCUSATIONS AGAINST XBOX-SCENE Back in February 2022, an Xbox-Scene member made a direct and good faith attempt to contact LoveMHz regarding public claims involving death threats and phobic comments. We immediately asked for any specific names, messages, or links so that we could take action including banning any users involved. The message was clear, if something happened on our server, we wanted to know so it could be dealt with properly. As shown in the screenshot below, that request was made respectfully and privately. No response was ever received. Since then, Xbox-Scene moderators have publicly condemned any form of harassment or inappropriate behavior including the misuse of support channels or any comments encouraging harm. These statements reflected more than just good intentions they reflected real action and accountability within the community. https://discord.com/channels/770816616937160745/788849843257999381/1181975249173086238 Yet while we’re being accused of tolerating hateful behavior, it’s important to highlight that the same individual making these claims publicly posted things like…. “Add a shot of bleach to the Kool-Aid before drinking it next time.” We believe that telling anyone to harm themselves directly or indirectly is unacceptable, no matter who it's coming from or what the context is. https://discord.com/channels/770816616937160745/788849843257999381/1127668529517301800 XBOX-SCENE Final Thoughts. The Xbox-Scene community stands for open discussion, creative development, and mutual respect. We’ve always welcomed direct communication, but accountability must apply to everyone not just those being targeted. We will not tolerate attempts to silence, intimidate, or dismantle what this community has built. These actions aren’t just attacks on a Discord server or a website. They’re personal, targeted efforts to shut down voices, erase history, and divide a community that continues to thrive despite it all. It’s hypocritical to accuse others of “theft” and “leaked source code,” while selling a product that enables running the very same homebrew apps, dashboards, unsigned code, and games being criticized. The product doesn’t even function unless the user provides a copy of Microsoft’s 5838 BIOS file that was never publicly released, only exists on 1.6 revision Xbox consoles, and must be dumped from a 1.6 console. In its unmodified form, it only runs on 1.6 systems, so using it outside that context inherently requires modification reverse engineering or patching. To sidestep responsibility, the setup process simply prompts users to “supply a backup” of the BIOS even displaying its CRC32 and SHA1 checksums to verify it's the exact file. This doesn’t change the fact that the BIOS is not freely distributed and is tied to Microsoft’s intellectual property. The entire product currently depends on users providing this proprietary file themselves to even function the same kind of action he publicly criticizes when accusing others of requiring the XDK to compile their code. Let’s be honest, the original Xbox homebrew scene has long relied on Microsoft’s Xbox Development Kit, or XDK. Nearly every major application, emulator, and dashboard created from 2002 to today including XBMC, Avalaunch, Surreal64, SNES9x and many other applications were built using it. These XDKs were never officially released or sanctioned by Microsoft to the public. They made their way into the hands of the community through leaks, often from licensed developers, game studios and employees. But regardless of how they surfaced, they became the foundation for nearly all homebrew development on the platform. Like it or not, these unlicensed tools and the homebrew they enabled inspired creativity and development for over two decades. From original apps to ports of popular PC apps or emulators, they helped build and shape an iconic scene that left a lasting mark on gaming history. Many of the ideas, innovations, and even features seen in later consoles and applications can trace their roots back to this community. We’ve said what needed to be said, and rather than continuing to go in circles, we’re choosing to refocus our time and energy on what the Xbox-Scene community was truly built for. We hold no ill will toward LoveMHz or anyone involved. Our focus remains on keeping the Xbox-Scene community united, not divided, through all of this. We ask that everyone, regardless of whom they feel aligned with, treat one another with respect. Harassment, hate sharing, or personal attacks will not be tolerated. If we see this behavior on our Discord, it will be dealt with appropriately. Let’s move forward together and continue the legacy and history of the Original Xbox for the next 20 years and beyond. If you're interested in learning more about the history of the original Xbox, the homebrew scene, and the people behind it, we highly recommend checking out “The Usual Places Modcast”. It features conversations with homebrew developers, community figures, and even former Xbox team members including: • Marco Micheletti, Supply Chain Program Manager at Xbox • Dan Duncalf and Dan White from Pipeworks Studios • Brian Schmidt, legendary sound designer and composer who worked at Microsoft You can find the full playlist here: https://www.youtube.com/playlist?list=PLame4OP5katQZ8RChL2XXUxB0Wwzlx-OO We encourage everyone to have a listen to these episodes which deep dive into the rich history that made the Original Xbox & Xbox scene what it is today.
-
To the Xbox Scene & Community, The following blog titled Theft in the Xbox Scene (Archived) was recently brought to our attention that makes some serious accusations against members in the Xbox scene and community, accusing various developers, teams and contributors of theft, deception, and more. Naturally, it caught a lot of attention. But instead of staying quiet or letting rumors take over, the community decided to respond, united as one. This post isn’t going to be about drama. It’s about setting the record straight. Many whom were named or implicated have taken the time to respond directly to the claims. Some responses are short, others go deep into the details, but each one speaks for itself. We’ve gathered them all here so you can read them yourself and make up your own mind. Table of Contents: An XBOX-SCENE Statement Team Resurgent Equinox Clarifying False Claims About the Tepache Repository and STM32 Hardware The Reddit Moderation Team Speaks GoTeamScotch Response Statement By Harcroft Statement By Skye Darkone83 Statement Regarding Recent Allegations by MakeMHz LonWay Technologies Milenko – A Personal Statement Citations and References
-
I would like to announce that me and a friend of mine have finally Gotten the XR8D map manager windows client and the Avalaunch map downloader for Rainbow Six 3 working (This is for the patched version of Avalaunch) if you have any individual map files for RS3 hanging around then we would appreciate if you can send them to us at this email [contact at ogxbox dot org]
-
XycloMod: flash the on-board BIOS on v1.6
Dark Destiny replied to Prehistoricman's topic in Onboard Bioschip (TSOP)
Thanks. The flasher refused to flash when set to 3.3v. Hag suggested to set it to 5.0v, which I did, and from that moment the flasher worked just fine. - Earlier
-

XycloMod: flash the on-board BIOS on v1.6
MrMario2011 replied to Prehistoricman's topic in Onboard Bioschip (TSOP)
Lovely work here! Although getting a second glance, I noticed that your programmer is set to 5v instead of 3.3v, is that working fine for you? I was surprised as the guide here stated 3.3v would be needed. -
We wish to inform our users and visitors that we temporarily disabled some threads and links on our forum subject to a DMCA-takedown notice today. Our team took the complaint seriously and the offending content has been temporarily disabled. The disabled links were related to the following topics: * PrometheOS download thread and download links * Cerbios-download-thread and download links * DL-Cerbios bios mirror archive thread (1Fichier, Mega) We thank our users for their understanding and support.