
Huge shout out to Nemesis who gave us the chance to test his new fan mod for the original xbox. The mod will be released soon. Keep an eye out in his store XeniumMods!
Note: This is still in beta. There may be adjustments in the final product.
Some weeks ago I received the package from Nemesis with the dual fan-mod. After I ordered the correct fans I started to build it into one of my spare xbox consoles. The console is a v1.0 with cerbios flashed to the tsop. The only extra mod I did was replacing the GPU heatsink with the 12v mini fan with a heatsink with one of a later model.
Parts I used for this mod:
- Noctua NF-A6x25 FLX, 60mm
- 2x Noctua NF-A8 FLX, 80mm
- 3pin fan splitter (I used another model)
Step 1 Replacing the stock fan:
I decided to replace the stock fan with a 60mm noctua fan. First remove the old fan from the case.

You need to place the noctua fan in the bracket (mind the direction of the fan, the fan must blow air out of the case)


If you install the fan in the bracket you can add the mounting tabs to the bracket like this:


Then put it in place where the original fan was:

To power the fan I choose to use the 3pin header where the old 12v gpu fan was powered. In later revisions (v1.1-v1.4) there is no fan header there but the holes are there. With the later models you can solder the fan header there (included in the kit). Keep in mind if you use this fan header the fan spins at 100%.
For v1.6 boards there is no way to solder in an extra header, for this console you need to use another way to power the fan)
You can power all the noctua fans from the one 3pin header if you want. The stock fan is rated at 3.2w. The 60mm noctua fan is rated at 1.44w and the 80mm at 0.84 each, so this would be a total of 3.12w for the 3 fans.

There are 2 tabs in the kit to close the holes from the stock fan on the underside of the xbox:


Step 2 Install the fan shroud:
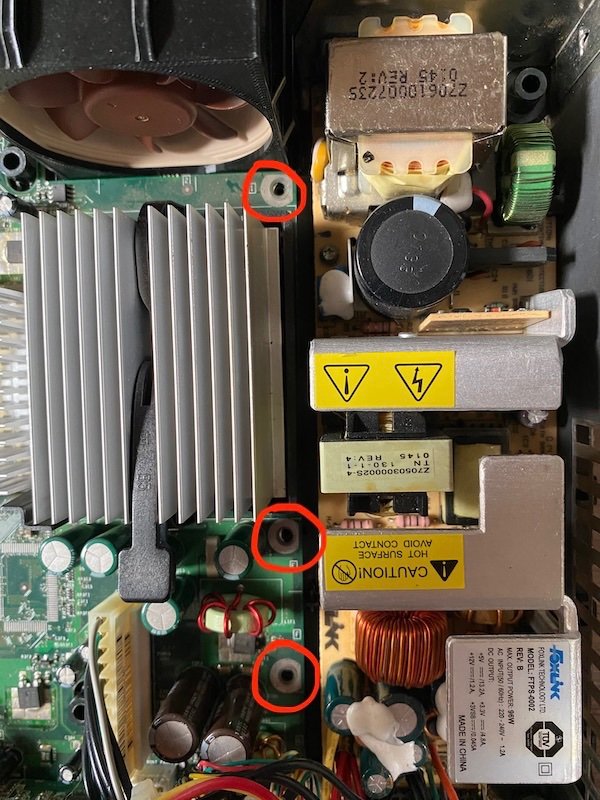
To install the fan shroud remove these 3 screws from the motherboard:
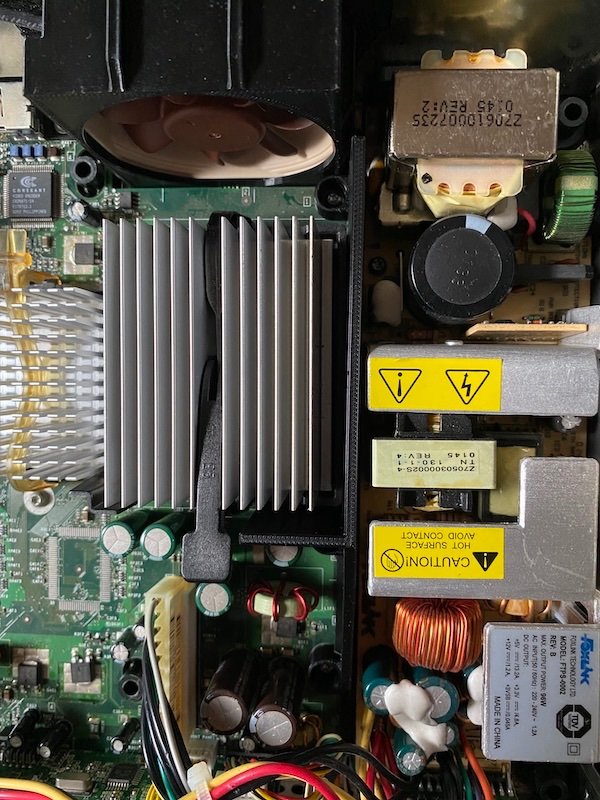
Then put the shroud in place and put the screws back in place:
Step 3 Installing the dvd remove kit pcb:
NOTE: If you use a modern bios like CerBIOS you can skip this step because CerBIOS has an option to completely remove the dvd software by setting "DriveSetup = 2" in the cerbios.ini on your c drive.
If you use an older scene bios like ind-bios, x2, x3, evox m8 or project stellar you need to trick the xbox that there is a dvd present. Otherwise you will get stuttering in the dashboard when you go to the file explorer.

I just did stick the pcb on the back of the console with double sided tape.

Step 4 Install the dvd remove front bezel holder:
Remove the front bezel of your dvd drive and put it on this part of the kit:

And screw it in place with the 2 screws where the dvd drive originally was screwed in.

I also routed my molex power for the hdd drive like this.
Step 5 Install the 80mm fans:
Place your fans like this so they blow to the motherboard. Here I used a 3pin splitter cable (with this version I can attach 4 fans to one fan header). Also install the 2 cylinder spacers to support he bracket.


Screw the fans tight with 2x4 screws and use one of the 2 top peaces to do this (1 black and 1 blue)

Step 6 Install the hdd drive in the caddy:
Remove the dvd drive from it's caddy and install the 3d printed hdd holder:

Then install the hdd drive in it and screw the hdd from the bottom:

Step 7 Start to assemble back the xbox:
First you need to install the HDD back in the xbox, but before you do this connect the 2 80mm fans to the 3pin header on the motherboard.


Some test results:
The fanspeed setting I used:
- in bios 100%
- in dash 20%
- xbox output fan is always at 100% (60mm)
The noctua 60mm fan is even at 100% reasonable quiet, not really loader than the stock fan at default speed.
In dash at 20% for the 80mm fans they do not come over the sound of the output fan
when in game at 100% you hear them if you turn the sound down but its not an distracting sound.
These are all noctua fans, these are known to be silent, other fans can give different results, maybe yours cool better but have more sound, ect
The temps I had where:
- after playing colin mcrae rally 2005 cpu:39 mb:36
- after playing pro race driver cpu:35 mb:37
-
 1
1
Recommended Comments
There are no comments to display.